


B-4
OPERATION
B-4
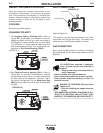
MAKING A WELD
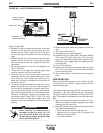
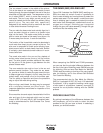
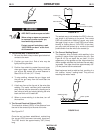
FIGURE B.5 – WELDING SETUP
READ the LEARNING TO WELD section of this man-
ual prior to making your first weld. Also, refer to Table
B.1 and the Procedure Decal located on the inside of
the wire drive compartment door of your machine for
process selection, consumables, and quick tips for
welding.
1. Select the right welding process based on the type
and condition of the pieces to be welded; the envi-
ronment in which welding is to be done; and the
desired finished appearance of the weld.
2. Select and install the welding wire to match the
process. Use Genuine Lincoln Electric Brand wire.
Wire quality is essential for successful welding.
3. Install the drive roll, contact tip, and nozzle appro-
priate for the weld process.
MIG PAK HD
WORKPIECE
GUN CABLE
ARC
WORK CLAMP
4. Check that the polarity is correct for the welding wire
being used and that the gas supply, if required, is
turned on.
5. Refer to Figure B.5. Connect the work clamp to the
metal to be welded. The work clamp must make
good electrical contact to the work piece. The work
piece must also be grounded as stated in Arc
Welding Safety Precautions in the beginning of this
manual.
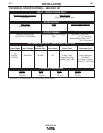
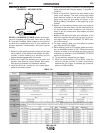
6. Based on the welding process type and material
thickness of the work piece, use the chart below (or
on the procedure decal located on the wire drive
door) to set the correct wire feed speed and heat
range setting.
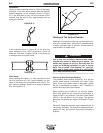
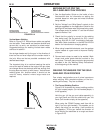
7. Based on the weld joint type and orientation of the
weld joint, position the gun into the joint at the cor-
rect angle. Refer to the LEARNING TO WELD sec-
tion of this manual.
8. To begin welding, raise your hand shield to protect
your eyes and pull the trigger.
9. While welding, travel at a constant speed and main-
tain an electrode stickout of 3/8". Follow the correct
direction of travel for the process and joint type and
orientation as detailed in the LEARNING TO WELD
section of this manual.
10. To stop welding, release the gun trigger.
11. When no more welding is to be done, close the
valve on the gas cylinder (if used), momentarily
operate the gun trigger to release gas pressure,
and turn off the machine.
TABLE B.1