


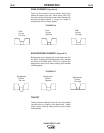

No Foot / Hand Amptrol
1. Adjust the arc amperage with the left knob
on the display panel.
2. Turn the right knob on the display panel
until the Output Control is ON. Gas will
start to flow.
3. Touch the tungsten to the work piece.
4. Lift the tungsten to create an arc and weld.
5. Stop welding by turning the Output Control
to OFF, or by pulling away the tungsten
from the work.
6. Gas flow will continue for a short time and
then shut-off.
1. Adjust the arc amperage with the left knob
on the display panel.
2. Turn the right knob on the display panel
until the Output Control is ON.
3. Open the gas valve on the TIG torch.
4. Touch the tungsten to the work piece.
5. Lift the tungsten to create an arc and weld.
6. Stop welding by turning the Output Control
to OFF, or by pulling away the tungsten
from the work.
7. Close the gas valve on the TIG torch.
B-23
OPERATION
B-23
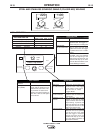
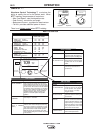
GTAW (TIG) WELDING
The POWER FEED™ / Power Wave system is excel-
lent for Touch Start TIG welding.
The system supports TIG torches with or without gas
control valves. TIG torches with gas control valves
connect directly to the gas flow regulator. For TIG
torches without gas control valves, connect the output
gas hose on the wire feeder to the TIG torch gas
hose.
The wire feeder gas solenoid may be enabled or dis-
abled by parameter P.8 in the set-up menu found in
this operations section.
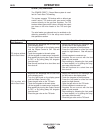
With Foot / Hand Amptrol
1. Adjust the maximum arc amperage with
the left knob on the display panel.
2. Touch the tungsten to the work piece.
3. Press the foot pedal or slide the hand
amptrol a slight amount. Gas will start to
flow.
4. Lift the tungsten to create an arc.
5. Regulate the arc current with the foot
pedal or hand amptrol.
6. Stop welding by releasing the foot pedal
or hand amptrol, or by pulling the tung-
sten away from the work.
7. Gas will continue for a short time and
then shut-off.
1. Adjust the maximum arc amperage with
the left knob on the display panel.
2. Touch the tungsten to the work piece.
3. Press the foot pedal or slide the hand
amptrol a slight amount.
4. Open the gas valve on the TIG torch.
5. Lift the tungsten to create an arc.
6. Regulate the arc current with the foot
pedal or hand amptrol.
7. Stop welding by releasing the foot pedal
or hand amptrol, or by pulling the tung-
sten away from the work.
8. Close the gas valve on the TIG torch.
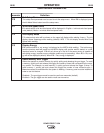
POWER FEED™ 25M
Touch Start TIG
Weld Sequence
TIG torches without
built-in Gas Valves.
TIG torches with
built-in Gas Valves.