


C-1
C-1
ACCESSORIES
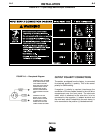
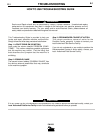
DRIVE ROLL KITS
Refer to Table C.1 for various drive roll kits that are
available for the PM 255. All items in Bold are sup-
plied standard with the POWER MIG.
TABLE C.1
3/64" (1.2 mm) ALUMINUM
FEEDING KIT (K1703-1)
This kit helps push feeding aluminum through stan-
dard machine feeder and gun. It provides gun and
wire drive conversion parts to weld with 3/64" (1.2
mm) aluminum wire. 5356 alloy aluminum wire is rec-
ommended for best push feeding performance.
Kit includes drive rolls and wire guide plate for the
wire drive, liner and two contact tips for the gun, along
with installation instructions.
K363P READI-REEL ADAPTER
The K363P Readi-Reel Adapter mounts to the 2" spin-
dle. It is needed to mount the 22-30 lb. Readi-Reels.
DUAL CYLINDER MOUNTING KIT
(K1702-1)
Permits stable side-by-side mounting of two full size
(9" dia. x 5' high) gas cylinders with “no lift” loading.
Simple installation and easy instructions provided.
Includes upper and lower cylinder supports, wheel
axles and mounting hardware.
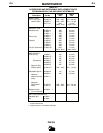
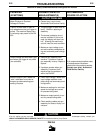
ALTERNATIVE MAGNUM GMAW
GUN AND CABLE ASSEMBLIES
The following Magnum 250L gun and cable assem-
blies are separately available for use with the PM 255.
Each is rated 200 amps 60% duty cycle (or 250 amps
40% duty) and is equipped with the integrated con-
nector, twist-lock trigger connector, fixed nozzle and
insulator, and includes a liner, diffuser, and contact
tips for the wire sizes specified:
MAGNUM GUN CONNECTION KIT
(Optional K466-6)
Using the optional K466-6 Magnum Connection kit for
the PM 255 permits use of standard Magnum 200,
300 or 400 gun and cable assemblies.
TIMER KIT INSTALLATION
(Optional K1701-1)
The timer kit adds selectable 4-step trigger interlock,
spot and Run-In functions and manual adjustment of
burnback time. Install as follows, or per the instruc-
tions included with the kit:
Remove all input power to the PM 255 before pro-
ceeding.
1. Verify that the following items have been included
in the kit:
A. Timer board/with harness and panel assembly .
B. Two screws.
2. Prepare for kit installation by turning the power
switch off and disconnecting power from the
machine.
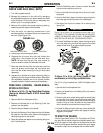
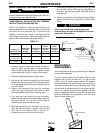
3. Remove the lower cover panel from the front of the
machine by removing the two screws which secure
it using a screwdriver.
Wire Size Drive Roll Kit
.023”-.030” (0.6-0.8 mm)
KP1696-030S
Solid
.035” (0.9 mm) KP1696-035S
Steel
.045” (1.2 mm) KP1696-045S
Cored
.035” (0.9 mm) KP1697-035C
.045” (1.2 mm) KP1697-045C
Aluminum
3/64” (1.2 mm) KP1695-3/64A
WARNING
English Wire Metric Wire
Length Part No. Size Size
10' (3.0 m) K533-1
12' (3.6 m) K533-2 .035 – .045" 0.9 – 1.2 mm
15' (4.5 m) K533-3
10' *3.0 m) K533-4
12' (3.6 m) K533-5 .025 – .030" 0.6 – 0.8 mm
15' (4.5 m) K533-6
PM 255