


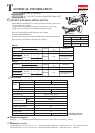


P 3/ 8
R
epair
[3] DISASSEMBLY/ASSEMBLY
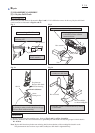
[3]-1. Keyless Drill Chuck
DISASSEMBLING
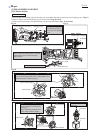
Correct setting of Hex Wrench 8
Clamp the long portion of Hex wrench 8
when using vise.
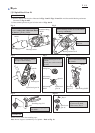
Remove Keyless drill chuck as illustrated in Figs. 2 and 3. If it is difficult to remove in this way, Keyless drill chuck
can be removed as illustrated in Figs.2A and 3A.
Hex wrench 8
Clamp the flat surface
of Hex wrench 8.
Vise
Hex wrench 8
Hex wrench 8
1. Hold Hex wrench 8 with Keyless drill chuck.
2. Firmly gripping the body in the near
of Terminal, turn the machine
counterclockwise.
Fig. 2 Fig. 3
Fig. 2A Fig. 3A
Vise
1R139 modified
as shown in Fig. 2A
1R139
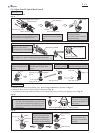
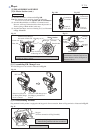
(1) Do the reverse of the disassembling steps. Refer to Figs. 3 and 2., or Figs. 3A and 2A.
(2) Turn the machine or Hex wrench clockwise to tighten Keyless drill chuck. The fastening torque for Drill chuck is
40 - 45 N.m.
14mm
width groove
Make the thickness of this portion thin to 2.5mm
by grinding in order to insert 1R139 into the gap
between chuck and Gear housing.
2.5mm in thickness
Gap between
Keyless drill chuck
and Gear housing
1. Hold Hex wrench 8
with Keyless drill chuck.
2. Turn Hex wrench 8 counterclockwise by striking
with Hammer.
ASSEMBLING
Note: Keyless drill chuck may further turn resisting shaft lock mechanism, while sounding like clutch in work.
This phenomenon does not show any trouble, but Keyless drill chuck is tightened firmly.