


9
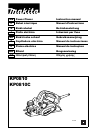
Elbow (optional accessory) (Fig. 15)
Use of elbow allows change of chip discharge direction to
perform cleaner work.
Install the elbow (optional accessory) on the tool by just
slipping on it. To remove it, just pull it out.
OPERATION
Hold the tool firmly with one hand on the knob and the
other hand on the switch handle when performing the tool.
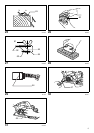
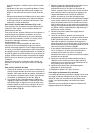
Planing operation (Fig. 16)
First, rest the tool front base flat upon the workpiece
surface without the blades making any contact. Switch on
and wait until the blades attain full speed. Then move the
tool gently forward. Apply pressure on the front of tool at
the start of planing, and at the back at the end of planing.
Planing will be easier if you incline the workpiece in
stationary fashion, so that you can plane somewhat
downhill.
The speed and depth of cut determine the kind of finish.
The power planer keeps cutting at a speed that will not
result in jamming by chips. For rough cutting, the depth of
cut can be increased, while for a good finish you should
reduce the depth of cut and advance the tool more slowly.
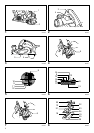
Shiplapping (Rabbeting) (Fig. 17)
To make a stepped cut as shown in the figure, use the
edge fence (guide rule).
Adjust the shiplapping depth using a depth guide
(accessory).
Draw a cutting line on the workpiece. Insert the edge
fence into the hole in the front of the tool. Align the blade
edge with the cutting line. (Fig. 18)
Install the edge fence on the tool and secure it with the
washer and thumb screw (A). Loosen the thumb screw (B)
and adjust the edge fence until it comes in contact with
the side of the workpiece. Then tighten the thumb screw
(B) securely. (Fig. 19)
When planing, move the tool with the edge fence flush
with the side of the workpiece. Otherwise uneven planing
may result.
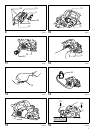
CAUTION:
• The blade edge should be made to protrude outside
slightly (0.2 mm - 0.4 mm) for shiplapping. (Fig. 20)
You may wish to add to the length of the fence by
attaching an extra piece of wood. Convenient holes are
provided in the fence for this purpose, and also for
attaching an extension guide (optional accessory).
(Fig. 21)
Chamfering (Fig. 22)
To make a chamfering cut as shown in the figure, align
one of three “V” grooves in the front base with the edge of
the workpiece and plane it. (Fig. 23)
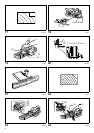
Use of chamfering rule (optional accessory) assures more
tool stability when shiplapping. (Fig. 24)
To install the chamfering rule, remove two screws on both
sides of the front of the tool and set the depth of cut to
4 mm. And then install it on the front base of the tool and
secure it the screws as shown in the figure.
When doing a great amount of chamfering, place an edge
of chamfering rule so that it contacts workpiece and make
many passes of planing as shown in the figure. (Fig. 25)
MAINTENANCE
CAUTION:
• Always be sure that the tool is switched off and
unplugged before attempting to perform inspection or
maintenance.
• Never use gasoline, benzine, thinner, alcohol or the
like. Discoloration, deformation or cracks may result.
Sharpening the planer blades
For standard blades only
Always keep your blades sharp for the best performance
possible. Use the sharpening holder to remove nicks and
produce a fine edge. (Fig. 26)
First, loosen the two wing nuts on the holder and insert
the blades (A) and (B), so that they contact the sides (C)
and (D). Then tighten the wing nuts. (Fig. 27)
Immerse the dressing stone in water for 2 or 3 minutes
before sharpening. Hold the holder so that the both blades
contact the dressing stone for simultaneous sharpening at
the same angle. (Fig. 28)
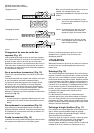
Replacing carbon brushes (Fig. 29)
Remove and check the carbon brushes regularly.
Replace when they wear down to the limit mark. Keep the
carbon brushes clean and free to slip in the holders.
Both carbon brushes should be replaced at the same
time. Use only identical carbon brushes.
Use a screwdriver to remove the rear cover. (Fig. 30)
Take out the worn carbon brushes, insert the new ones
and secure the rear cover. (Fig. 31)
To maintain product SAFETY and RELIABILITY, repairs,
any other maintenance or adjustment should be
performed by Makita Authorized Service Centers, always
using Makita replacement parts.
OPTIONAL ACCESSORIES
CAUTION:
• These accessories or attachments are recommended
for use with your Makita tool specified in this manual.
The use of any other accessories or attachments might
present a risk of injury to persons. Only use accessory
or attachment for its stated purpose.
If you need any assistance for more details regarding
these accessories, ask your local Makita Service Center.
• High-speed steel Planer blade
• Tungsten-carbide Planer blade (For longer blade life)
• Mini planer blade
• Sharpening holder assembly
• Blade gauge
• Set plate set
• Edge fence (Guide rule)
• Dressing stone
• Dust bag assembly
• Elbow
• Socket wrench
• Chamfering rule assembly
NOTE:
• Some items in the list may be included in the tool
package as standard accessories. They may differ
from country to country.