19
ENGLISH
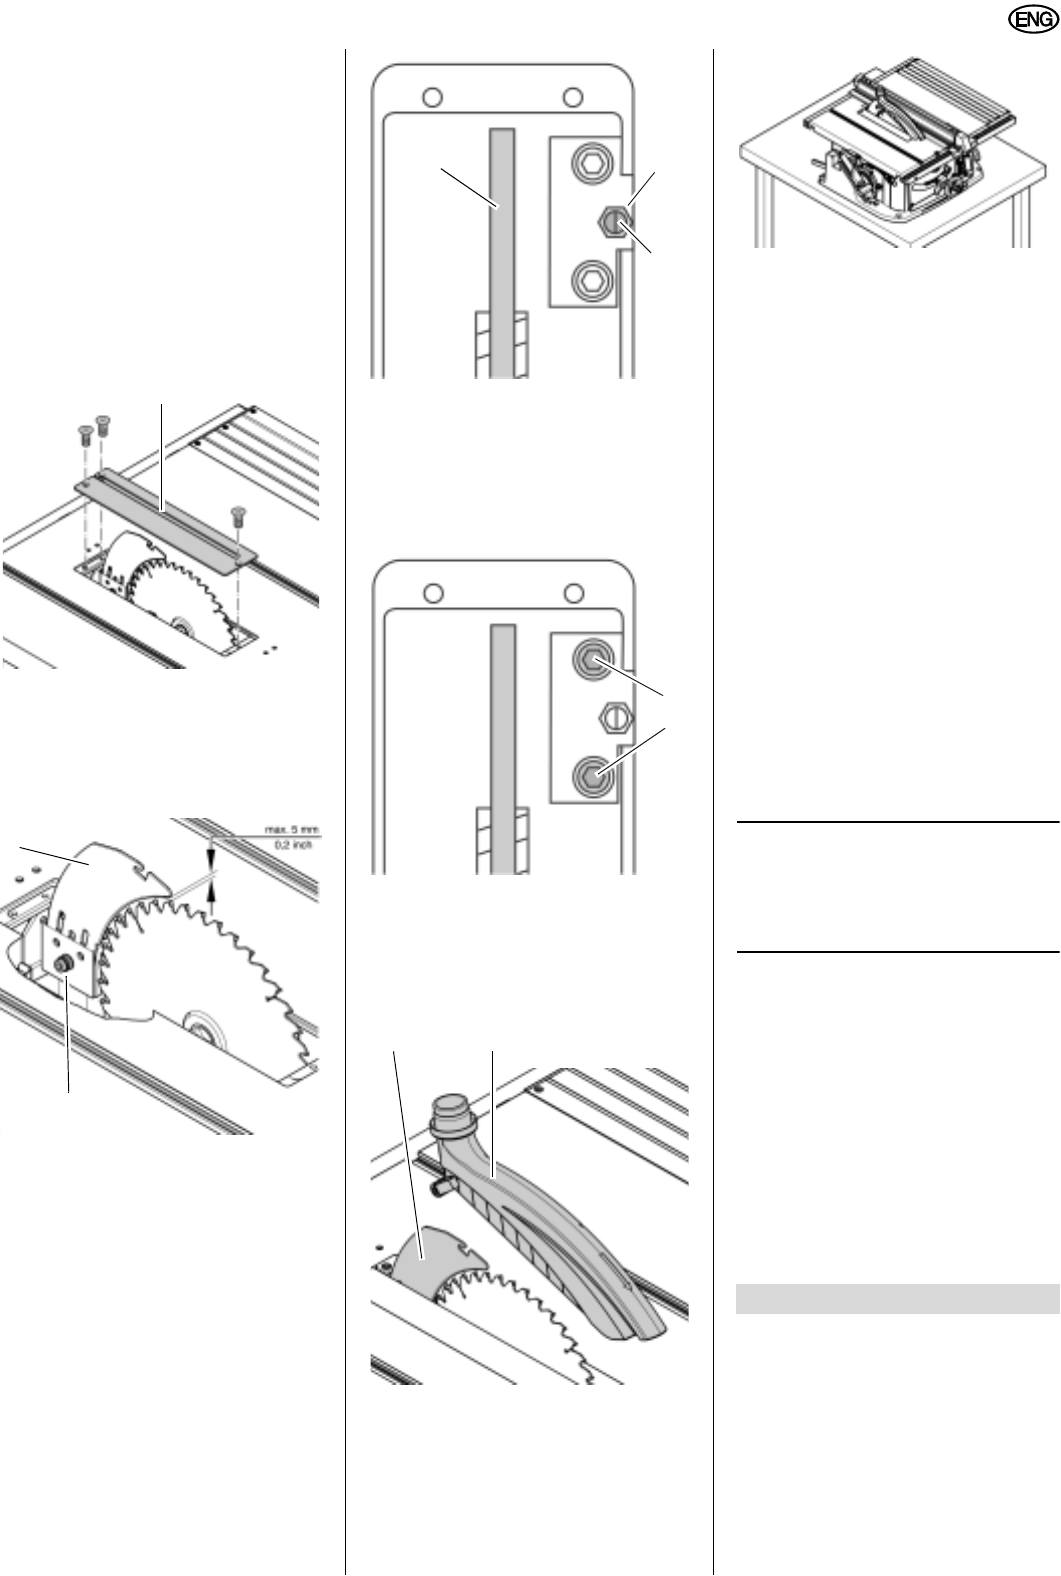
Distance between the saw
blade's outer edge and the riving
knife needs to be 3 – 5 mm.
The riving knife must be in align-
ment with the saw blade.
A
Danger!
The riving knife is one of the
safety devices and must be correctly
installed for safe operation.
Only if realignment of the riving knife is
necessary:
3. Loosen table insert (49) and remove
from table.
Setting the distance to the saw blade:
4. Loosen hexagon socket head cap
screw (50) (to do so, turn hexagon
socket head cap screw counter-
clockwise!)
5. Pull riving knife (51) fully up against
the stop and align: the gap between
saw blade and riving knife must be 3
to 5 mm.
6. Tighten hexagon socket head cap
screw (50) (to do so, turn hexagon
socket head cap screw clockwise!)
Lateral alignment:
riving knife and saw blade (52) must be
in true alignment.
7. Loosen hexagon nut (53) and adjust
vertical alignment with machine
screw (54).
8. Lock machine screw with (53).
9. Loosen both hexagon socket screws
(55).
10. Align riving knife flush with the saw
blade.
11. Tighten both hexagon socket
screws (55).
12. Reinstall table insert.
Blade guard installation
1. Raise saw blade fully.
2. Install blade guard (57) on riving
knife (56).
7.2 Installation
There are two ways to ensure a firm
stand of the machine:
mounted on floor stand
(accessory);
mounted on sturdy table or bench.
7.3 Mains connection
B
Danger! High voltage
x Operate this machine in dry sur-
roundings only.
x Operate machine only on a power
source meeting the following
requirements (see also “Techni-
cal Specifications”):
outlets properly installed,
earthed, and tested.
mains voltage and system fre-
quency conform to the voltage
and frequency shown on the
machine´s rating label;
fuse protection by a residual
current operated device (RCD)
of 30 mA sensitivity;
System impedance Z
max
at the
interconnection point (house
service connection) 0.35 Ohm
maximum.
3
Note:
Check with your local Electricity
Board or electrician if in doubt whether
your house service connection meets
these requirements.
x Position power supply cable so it
does not interfere with the work
and is not damaged.
x Protect power supply cable from
heat, aggressive liquids and
sharp edges.
x Use only rubber-jacketed exten-
sion cables with sufficient lead
cross-section (see “Technical
Specifications”).
x Do not pull on power supply
cable to unplug.
A
Risk of injury!
This saw may only be operated
by one person at a time. Other per-
sons shall stay only at a distance to
the saw for the purpose of feeding or
removing stock.
Before starting work, check to see
that the following are in proper work-
ing order:
power cable and plug;
49
50
51
52
53
54
55
56 57
8. Operation


