


6
7
ASSEMBLY
WARNING Recharge only with the
charger specified for the battery.
For specifi c charging instructions, read the
operator’s manual supplied with your charger
and battery.
WARNING Always remove battery
pack before changing or removing
accessories. Only use accessories specifi -
cally recommended for this tool. Others may
be hazardous.
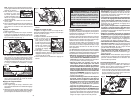
Removing Battery Pack from Tool
Push in the release buttons and pull the battery
pack away from the tool.
Inserting Battery Pack into Tool
To insert the battery pack onto the tool, slide the
pack onto the body of the tool. Make sure it latches
securely into place.
Selecting Blade
Always use sharp blades. Dull blades tend to
overload the tool and increase the chance of
KICKBACK (see "Causes and Operator Prevention
of KICKBACK"). Only use thin kerf blades with a
maximum safe operating speed greater than the no
load RPM marked on the tool's nameplate. Read
the blade manufacturer's instructions before use.
Do not use any type of abrasive cut-off wheel or
dry diamond cutting blades.
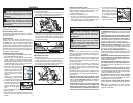
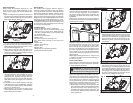
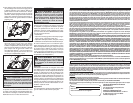
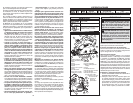
Installing and Removing Blades
1. REMOVE BATTERY PACK BEFORE INSTALL-
ING OR REMOVING BLADES.
2. Place the saw on a fl at surface with the blade
facing upwards. To remove the bolt from the
spindle, push in the spindle lock button. While
holding in the spindle lock button, use the wrench
provided with the tool to turn the bolt clockwise.
Remove the bolt and blade fl ange.
3. Slide the lower guard lever
up to raise the lower guard.
Remove the blade from the
spindle. Always clean the spin-
dle, upper guard and lower
guard to remove any dirt and
sawdust.
NOTE: Do not remove inner
blade fl ange. Larger diameter
of inner fl ange should face the blade.
4. To install a blade, place the blade on the spindle
with the teeth pointing in
the same direction as the
arrow on the lower guard.
Release the lower guard
lever.
5. Place the blade fl ange on the spindle and hand
tighten the bolt.
6. While holding in the spindle lock button, use the
wrench to turn the bolt counterclockwise and
tighten.
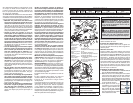
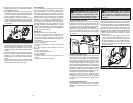
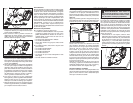
Adjusting Depth
1. Remove battery pack.
2. To adjust the depth of the cut, hold the saw by
the handle and loosen the depth adjusting lever
by pushing it down toward the shoe (Fig. 1).
3. Raise or lower the shoe to the desired position.
Markings in 1/4" increments are located on the
inner side of the upper guard for depth setting.
For the proper depth setting, the blade should
extend no more than 1/8" to 1/4" below the mate-
rial being cut (Fig. 2).
1/4"
4. Lift the depth adjusting lever up towards the
motor housing to secure the shoe position.
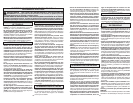
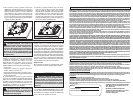
Adjusting Bevel Angle
1. Remove battery pack.
2. To adjust the angle of the cut, hold the saw by the
handle and loosen the bevel adjusting knob.
3. Hold the front of the shoe and rotate the saw by
the handle to the desired angle as indicated by
the markings on the bevel scale (Fig. 3).
Bolt
Outer
fl ange
Inner
fl ange
Spindle
Arrow
Fig. 1
Fig. 2
Fig. 3
4. Tighten the bevel adjusting knob securely.
OPERATION
WARNING To reduce the risk of injury,
keep hands away from the blade
and other moving parts. Always wear safety
goggles or glasses with side shields. Use
only specifi cally recommended accessories.
Others may be hazardous.
Adjusting the Blade to Shoe
The shoe has been adjusted at the factory to a 90
degree setting. Inspect the saw regularly to make
sure the blade is 90 degrees to the shoe.
1. Remove battery pack.
2. Set the bevel pointer to zero.
3. To make sure the blade is 90 degrees to the
shoe, place saw on the blade side and retract
lower guard. Place a square against the blade
and shoe to inspect the degree setting.
Causes and Operator Prevention of KICK-
BACK:
KICKBACK is a sudden reaction to a pinched,
bound or misaligned saw blade, causing an un-
controlled saw to lift up and out of the workpiece
toward the operator.
When the blade is pinched or bound tightly by the
kerf, or cutting slot, closing down, the blade stalls
and the motor reaction drives the unit rapidly back
toward the operator.
If the blade becomes twisted or misaligned in
the cut, the teeth at the back edge of the blade
can dig into the top surface of the wood causing
the blade to climb out of the kerf and jump back
toward operator.
KICKBACK is the result of tool misuse and/or
incorrect operating procedures or conditions and
can be avoided by taking proper precautions as
given below:
• Maintain a fi rm grip with both hands on the
saw and position your body and arm to allow
you to resist KICKBACK forces. KICKBACK
forces can be controlled by the operator, if proper
precautions are taken.
• When blade is binding, or when interrupting
a cut for any reason, release the trigger and
hold the saw motionless in the material until
the blade comes to a complete stop. Never at-
tempt to remove the saw from the work or pull
the saw backward while the blade is in motion
or KICKBACK may occur. Investigate and take
corrective actions to eliminate the cause of blade
binding.
• When restarting a saw in the workpiece, center
the saw blade in the kerf, or cut, and check that
saw teeth are not engaged into the material. If
saw blade is binding, it may walk up or KICKBACK
from the workpiece as the saw is restarted.
• Support large panels to minimize the risk of
blade pinching and KICKBACK. Large panels
tend to sag under their own weight. Supports must
be placed under the panel on both sides, near the
line of cut and near the edge of the panel.
• Do not use dull or damaged blades. Unsharp-
ened or improperly set blades produce narrow
kerf causing excessive friction, blade binding and
KICKBACK.
• Blade depth and bevel adjusting locking levers
must be tight and secure before making cut. If
blade adjustment shifts while cutting, it may cause
binding and KICKBACK.
• Use extra caution when making a “Pocket Cut”
into existing walls or other blind areas. The
protruding blade may cut objects that can cause
KICKBACK.
• Set the depth of cut for no more than 1/8" to
1/4" greater than the thickness of the stock.
The less blade exposed, the less chance of bind-
ing and KICKBACK. Before cutting, be sure depth
and bevel adjustments are tight.
• Be cautious of pitchy, knotty, wet or warped
stock. These are most likely to create pinching
conditions and possible KICKBACK. Do not rip
warped lumber. Avoid cutting nails.
• Use a rip fence or edge guide when ripping.
Guides improve control and reduce blade bind-
ing.
• Stay alert. Any distraction can cause twisting
or binding. Repetitive cuts may lull the user into
careless movements.
WARNING Always remove battery
pack before changing or removing
accessories. Only use accessories specifi -
cally recommended for this tool. Others may
be hazardous.
Bevel
Adjustment
Screw
4. To adjust the degree set-
ting, loosen the bevel
adjusting knob. Turn the
bevel adjustment screw
in or out until the blade is
at a 90 degree angle with
the shoe.
5. Tighten the bevel adjust-
ing knob securely.