


2
3
PERSONAL SAFETY
GENERAL POWER TOOL SAFETY WARNINGS
WORK AREA SAFETY
ELECTRICAL SAFETY
WARNING READ ALL SAFETY WARNINGS AND INSTRUCTIONS.
Failure to follow the warnings and instructions may result in electric shock, fi re and/or
serious injury. Save all warnings and instructions for future reference
The term "power tool" in the warnings refers to your mains-operated (corded) power tool or
battery-operated (cordless) power tool.
POWER TOOL USE AND CARE
SPECIFIC SAFETY RULES
SERVICE
• Keep work area clean and well lit. Cluttered or
dark areas invite accidents.
• Do not operate power tools in explosive atmo-
spheres, such as in the presence of fl ammable
liquids, gases or dust. Power tools create sparks
which may ignite the dust or fumes.
• Keep children and bystanders away while
operating a power tool. Distractions can cause
you to lose control.
• Power tool plugs must match the outlet. Never
modify the plug in any way. Do not use any
adapter plugs with earthed (grounded) power
tools. Unmodifi ed plugs and matching outlets will
reduce risk of electric shock.
• Avoid body contact with earthed or grounded
surfaces such as pipes, radiators, ranges and
refrigerators. There is an increased risk of elec-
tric shock if your body is earthed or grounded.
• Do not expose power tools to rain or wet con-
ditions. Water entering a power tool will increase
the risk of electric shock.
• Do not abuse the cord. Never use the cord for
carrying, pulling or unplugging the power tool.
Keep cord away from heat, oil, sharp edges
or moving parts. Damaged or entangled cords
increase the risk of electric shock.
• When operating a power tool outdoors, use an
extension cord suitable for outdoor use. Use
of a cord suitable for outdoor use reduces the risk
of electric shock.
• If operating a power tool in a damp location
is unavoidable, use a residual current device
(RCD) protected supply. Use of an RCD reduces
the risk of electric shock.
• Remove any adjusting key or wrench before
turning the power tool on. A wrench or a key
left attached to a rotating part of the power tool
may result in personal injury.
• Do not overreach. Keep proper footing and
balance at all times. This enables better control
of the power tool in unexpected situations.
• Dress properly. Do not wear loose clothing or
jewellery. Keep your hair, clothing and gloves
away from moving parts. Loose clothes, jewel-
lery or long hair can be caught in moving parts.
• If devices are provided for the connection of
dust extraction and collection facilities, ensure
these are connected and properly used. Use of
these devices can reduce dust-related hazards.
• Do not force the power tool. Use the correct
power tool for your application. The correct
power tool will do the job better and safer at the
rate for which it was designed.
• Do not use the power tool if the switch does
not turn it on and off. Any power tool that cannot
be controlled with the switch is dangerous and
must be repaired.
• Disconnect the plug from the power source
and/or the battery pack from the power tool
before making any adjustments, changing
accessories, or storing power tools. Such
preventive safety measures reduce the risk of
starting the power tool accidentally.
• Store idle power tools out of the reach of chil-
dren and do not allow persons unfamiliar with
the power tool or these instructions to operate
the power tool. Power tools are dangerous in the
hands of untrained users.
• Maintain power tools. Check for misalignment
or binding of moving parts, breakage of parts
and any other condition that may affect the
power tool operation. If damaged, have the
power tool repaired before use. Many accidents
are caused by poorly maintained power tools.
• Keep cutting tools sharp and clean. Properly
maintained cutting tools with sharp cutting edges
are less likely to bind and are easier to control.
• Use the power tool, accessories and tool bits
etc., in accordance with these instructions,
taking into account the working conditions
and the work to be performed. Use of the power
tool for operations different from those intended
could result in a hazardous situation.
• Have your power tool serviced by a qualifi ed
repair person using only identical replacement
parts. This will ensure that the safety of the power
tool is maintained.
• Stay alert, watch what you are doing and use
common sense when operating a power tool.
Do not use a power tool while you are tired or
under the infl uence of drugs, alcohol or medi-
cation. A moment of inattention while operating
power tools may result in serious personal injury.
• Use personal protective equipment. Always
wear eye protection. Protective equipment such
as dust mask, non-skid safety shoes, hard hat, or
hearing protection used for appropriate conditions
will reduce personal injuries.
• Prevent unintentional starting. Ensure the
switch is in the off-position before connecting
to power source and/or battery pack, picking
up or carrying the tool. Carrying power tools
with your fi nger on the switch or energising power
tools that have the switch on invites accidents.
• Wear ear protectors with impact drills. Expo-
sure to noise can cause hearing loss.
• Use auxiliary handles supplied with the tool.
Loss of control can cause personal injury.
• Hold power tools by insulated gripping sur-
faces when performing an operation where
the cutting tool may contact hidden wiring or
its own cord. Contact with a “live” wire will make
exposed metal parts of the tool “live” and shock
the operator.
• Keep hands away from all cutting edges and
moving parts.
• Maintain labels and nameplates. These carry
important information. If unreadable or missing,
contact a MILWAUKEE service facility for a free
replacement.
• WARNING Some dust created by power sanding,
sawing, grinding, drilling, and other construction
activities contains chemicals known to cause
cancer, birth defects or other reproductive harm.
Some examples of these chemicals are:
• lead from lead-based paint
• crystalline silica from bricks and cement and other
masonry products, and
• arsenic and chromium from chemically-treated
lumber.
Your risk from these exposures varies, depending
on how often you do this type of work. To reduce
your exposure to these chemicals: work in a well
ventilated area, and work with approved safety
equipment, such as those dust masks that are spe-
cially designed to fi lter out microscopic particles.
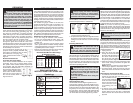
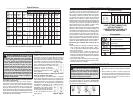
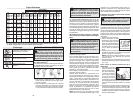
Specifi cations
Cat. No.
(RAD KIT)
1001-1
(3002-1)
1007-1
(***)
1101-1
(3102-1)
1107-1
(3107-1)
1107-6
(3107-6)
1250-1
(***)
No
Load
RPM
0-600
0-600
500
0-500
0-500
0-1000
RAD *
RPM
lo 0-400
hi 0-900
lo 0-400
hi 0-900
lo 0-335
hi 0-750
lo 0-335
hi 0-750
lo 0-335
hi 0-750
lo 0-665
hi 0-1500
Flat
boring
bit
1-1/2"
1-1/2"
1-1/2"
1-1/2"
1-1/2"
1-1/2"
1-1/2"
1-1/2"
1-1/2"
1-1/2"
1-1/2"
1-1/2"
1-1/2"
1-1/2"
1-1/2"
1-1/2"
--
--
Auger
bit
1-1/2"
1-1/2"
1-1/2"
1-1/2"
1-1/2"
1-1/2"
1-1/2"
1-1/2"
1-1/2"
1-1/2"
1-1/2"
1-1/2"
1-1/2"
1-1/2"
1-1/2"
1-1/2"
--
--
Ship
auger
bit
1-1/2"
1-1/2"
1-1/2"
1-1/2"
1-1/2"
1-1/2"
1-1/2"
1-1/2"
1-1/2"
1-1/2"
1-1/2"
1-1/2"
1-1/2"
1-1/2"
1-1/2"
1-1/16"
--
--
Wood
Volts
AC
120
120
120
120
120
120
Hole
saw
5"
5"
4"
5"
5"
4"
5"
6"
4-1/2"
5"
6"
4-1/2"
5"
6"
4-1/2"
3-1/8"
--
--
Capacities
Selfeed
bit
3-5/8"
3-5/8"
2-9/16"
3-5/8"
3-5/8"
2-9/16"
3-5/8"
4-5/8"
2-9/16"
3-5/8"
4-5/8"
2-9/16"
3-5/8"
4-5/8"
2-9/16"
2-1/4"
--
--
Hole
saw
3-1/2"
4-1/2"
3"
3-1/2"
4-1/2"
3"
3-3/4"
5"
3-1/2"
3-3/4"
5"
3-1/2"
3-3/4"
5"
3-1/2"
1-3/4"
--
--
Twist
drill
1/2"
1/2"
1/2"
1/2"
1/2"
1/2"
1/2"
1/2"
1/2"
1/2"
1/2"
1/2"
1/2"
1/2"
1/2"
1/2"
--
--
Carbide-
tipped
bit
1/2"
1/2"
1/2"
1/2"
1/2"
1/2"
1/2"
1/2"
1/2"
1/2"
1/2"
1/2"
1/2"
1/2"
1/2"
1/2"
--
--
Steel Masonry
33° **
RPM
0-600
0-600
500
0-500
0-500
0-1000
* The Right Angle Drill Kit can be purchased with some drills, or as an accessory.
** The 33° Angle Drill Kit is available as an accessory only (Cat. No. 48-06-2860).
*** RAD available as an accessory only (Cat. No. 48-06-2871).
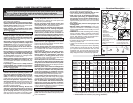
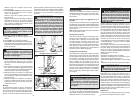
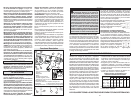
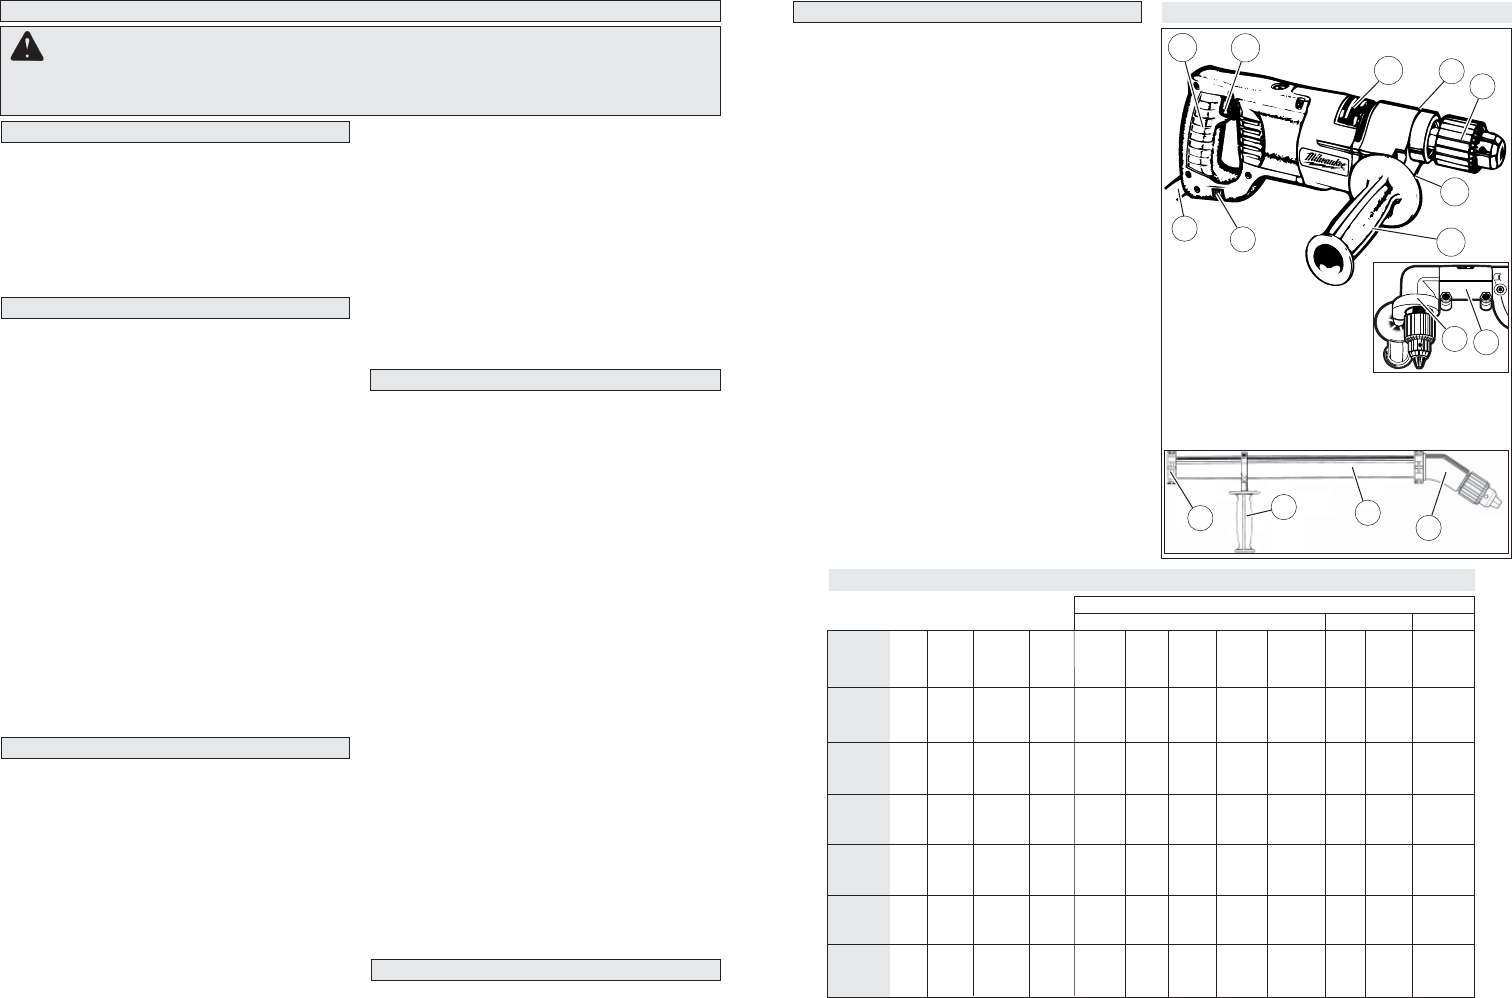
Functional Description
1. Handle
2. Trigger
3. Nameplate
4. Extension (not shown)
5. Side handle
6. Keyed chuck
7. Side handle socket
8. Forward/Reverse switch
9. Quik-Lok
®
cord (Cat. No. 1007-1 and 1107-1)
10.Ring clamp
11.Right angle drive unit
12.Clamp
Cat. No. 1107-1
2
3
4
1
6
7
8
5
10
11
9
12
14
13
15
13.Auxiliary side handle
14.30" extension tube
15.33° angle drive unit