


22
23
OPERATION
WARNING To reduce the risk of injury,
wear safety goggles or glasses with side
shields.
WARNING To reduce the risk of injury,
always unplug tool before attaching or remov-
ing accessories or making adjustments. Use
only specifi cally recommended accessories.
Others may be hazardous.
Typical Operation
1. Check the work surface to make sure it is clean
and free of foreign materials.
Paint, rust, scale or uneven surfaces decrease
the holding strength of the magnet. Chips, burrs,
dirt and other foreign materials on the surface
of the magnetic base will also decrease holding
power. Use a smooth, fl at fi le to keep the magnet
clean and free of nicks.
The electromagnetic drill press attaches mag-
netically to 3/8" or thicker ferrous stock. Do not
use on stock less than 3/8". The magnetic base
WILL NOT hold on nonmagnetic grades of stain-
less steel.
2. To install/remove cutter:
A. Raise the drill motor to its highest position.
Tighten stop knob.
B. Insert cutter into drill spindle with the two (2)
fl ats of the cutter aligned with set screws. Make
sure the center pin is inserted into the cutter.
NOTE: Cutter should be fully seated into drill
spindle.
C. Tighten set screws with 3/16" hex key provided.
D. Loosen the stop knob.
E. Reverse procedure to remove cutter.
NOTE: Do not remove cutter unless slug is
removed. Slug may eject unexpectedly. Avoid
contact with cutter tips. Periodically inspect the
cutter tips for loose or damaged tips.
3. Plug in tool to power source.
WARNING
• Do not use cutting fl uid in an overhead or
any other position that allows cutting fl uid
to enter motor or switch enclosure.
• Wet connections are shock hazards.
Prevent cutting fl uid from traveling along
cord and contacting the outlet, extension
cord connections or tool plug. Each time
tool is plugged in, elevate
extension cord or gang
box connections and ar-
range a drip loop. If plug or
connections get wet, turn
power off to outlet before
unplugging tool.
4. Move the spindle up so the cutter and center pin
are above the work surface.
5. Position the tool so the center pin is directly over
the desired cutting location. Push the magnet
switch to the “ON” position. The magnet indicator
light will turn on.
The cutting fl uid reservoir will empty as the center
pin contacts the work surface. When notching or
slotting, it is required to spray cutting fl uid directly
to the cutter and work piece with the supplied
hand pump. Keep hand pump away from moving
parts. Failure to use the lubricant properly will
cause cutter damage.
The use of HAWG WASH® cutting fluid is
recommended for long life of these cutters. The
operator is responsible for the application of lu-
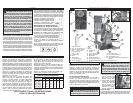
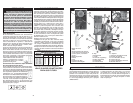
Fig. 6
7. With the drill on/off switch in the "OFF" position,
fi ll the cutting fl uid reservoir with cutting fl uid
through the slots in the drill spindle .
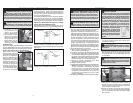
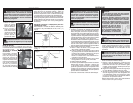
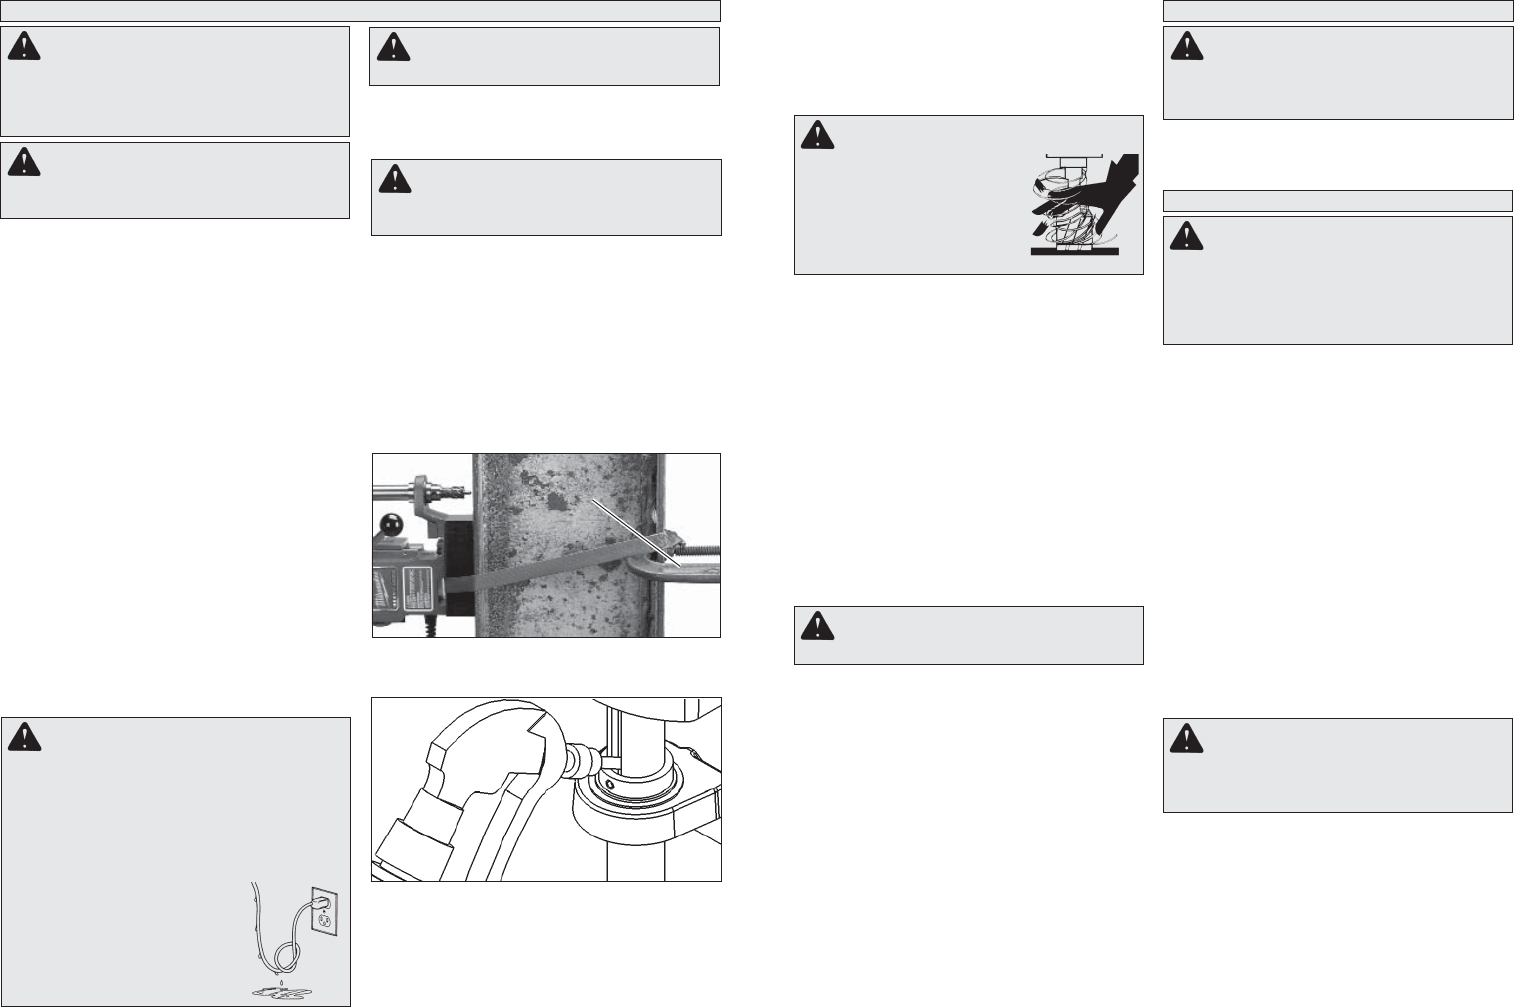
6. Use a safety strap on vertical or overhead situations.
A. Route the safety strap, ring side fi rst, through
the lower slot, and wrap it tightly around a solid,
rigid structure as shown. Make sure the strap
is not twisted.
B. Hook the safety strap snaphook provided to the
ring. Eliminate any slack in the strap.
C. When using on a vertical surface, secure the
safety strap with a c-clamp or similar device.
This will hold the strap in place and prevent the
tool from sliding down the vertical surface.
NOTE: Do not clamp to the strap. This may
damage the strap and cause it to break.
WARNING To reduce the risk of
injury, do not hold workpiece by hand.
WARNING To reduce the risk of injury,
always use a safety strap when drilling over-
head or on a vertical surface.
Fig. 5
C-clamp
MAINTENANCE
Maintaining Tools
Keep your tool in good repair by adopting a regular
maintenance program. Before use, examine the gen-
eral condition of your tool. Inspect guards, switches,
tool cord set and extension cord for damage. Check
for loose screws, misalignment, binding of moving
parts, improper mounting, broken parts and any
other condition that may affect its safe operation. If
abnormal noise or vibration occurs, turn the tool off
immediately and have the problem corrected before
further use. Do not use a damaged tool. Tag damaged
tools “DO NOT USE” until repaired (see “Repairs”).
Under normal conditions, relubrication is not necessary
until the motor brushes need to be replaced. After six
months to one year, depending on use, return your tool to
the nearest MILWAUKEE service facility for the following:
• Lubrication
• Brush inspection and replacement
• Mechanical inspection and cleaning (gears,
spindles, bearings, housing, etc.)
• Electrical inspection (switch, cord, armature, etc.)
• Testing to assure proper mechanical and electrical
operation
Cleaning
Clean dust and debris from vents. Keep the tool
handles clean, dry and free of oil or grease. Use
only mild soap and a damp cloth to clean your tool
since certain cleaning agents and solvents are
harmful to plastics and other insulated parts. Some
of these include: gasoline, turpentine, lacquer thin-
ner, paint thinner, chlorinated cleaning solvents,
ammonia and household detergents containing
ammonia. Never use fl ammable or combustible
solvents around tools.
Repairs
If your tool is damaged, return the entire tool to the
nearest service center.
ACCESSORIES
For a complete listing of accessories refer to your
MILWAUKEE Electric Tool catalog or go on-line
to www.milwaukeetool.com. To obtain a catalog,
contact your local distributor or a service center.
WARNING To reduce the risk of
injury, always unplug your tool before
performing any maintenance. Never disas-
semble the tool or try to do any rewiring
on the tool’s electrical system. Contact a
MILWAUKEE service facility for ALL repairs.
WARNING To reduce the risk of injury,
electric shock and damage to the tool, never
immerse your tool in liquid or allow a liquid
to fl ow inside the tool.
WARNING To
reduce the risk of injury,
always unplug the tool before attaching or remov-
ing accessories. Use only specifi cally recom-
mended accessories. Others may be hazardous.
9. These units have a 8:1 feed ratio: i.e. for every
pound applied to the handle, you create eight
pounds on the drill point. Even large bits only re-
quire a small amount of pressure on the handle.
Example: 20 Pounds on the handle creates 160
Pounds on the drill point.
When feeding the cutter into the material, apply
only enough force to produce a curled chip. Ap-
plying too little force will result in small broken
chips and increased cutting time. Applying too
much force will cause overheating of the cutter
resulting in short cutter life. Overheating of the
cutter can be noticed when cutter and chips turn
brown or blue. Excessive force can cause the
cutter to slow down to a point where cutting time
will increase. The use of cutting lubricants will
reduce cutting heat and increase cutter life
Use less feed pressure when slotting or notch-
ing because there is less support for the cutting
edges in these situations.
8. Start the drill motor by pulling the drill on/off
switch to the "ON" position.
10. Keep constant pressure throughout the entire
operation to prevent chips and burrs from
falling under the cutting edges. Cutting debris
under the cutter can make cutting diffi cult or
impossible.
11. When the cut is complete, withdraw the cutter
while the drill spindle is still rotating.
12. Stop the drill motor by pushing in the drill on/
off switch to the "OFF" position.
13. When the drill spindle has stopped rotating,
use a pliers to remove cutting debris and chips
from the cutter and spindle. Use care to avoid
damaging the cutter teeth.
14. If the slug is still present in the cutter, rotate the
feed handle to highest position. This will eject
the slug from the cutter. The center pin is spring
loaded. Provide protection from ejected slug for
people and property below cutting area.
15. Make sure you have a fi rm grip on the tool
before turning off the magnet. Push the mag-
net switch to the "OFF" position. The magnet
indicator light will turn off.
WARNING Excessive force will break
magnet free.
WARNING To reduce the risk of injury,
always keep hands, rags,
clothing, etc. away from mov-
ing parts and chips. Do not
try to remove chips while the
cutter is rotating. Chips are
sharp and can pull objects into
moving parts.
bricants other than HAWG WASH® cutting fl uid.
In overhead or vertical cutting applications, do
not use cutting fl uids. Use only lubricant pastes or
sprays recommended for high speed cutting. Do
not allow lubricant pastes and sprays to enter tool.