


page 9
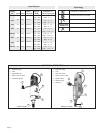
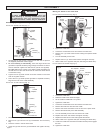
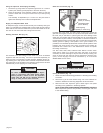
Leveling
Screws
Rod or Bolt
Fig. 13
WARNING!
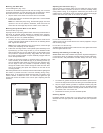
The vacuum gauge must read a minimum of 20
inches of mercury vacuum. To reduce the risk of
injury DO NOT CORE if the gauge reads less than 20
inches of mercury vacuum.
One vacuum pad is supplied with the Vac-U-Rig
®
and they can be pur-
chased separately for other Dymorigs. The vacuum pad is most effec-
tive when it is secured to a relatively smooth surface such as poured
concrete. If the surface is too porous or rough, the pad may not hold
securely. Before using a vacuum pad, always check the gasket on the
underside of the pad to make sure it isn't worn, cracked or torn. If it is,
immediately replace the gasket, otherwise the vacuum pad may not hold
the rig securely. To replace the gasket, see "Replacing Vacuum Pad
Gaskets" in the "Maintenance" section. See "Accessories" for gasket
part number.
1. To use the vacuum pad, tilt the base of the rig and slide the vacuum
pad under it so the threaded stud goes through the hole on the end
of the center slot on the base. Then set the stand upright.
2. Position the rig as required for coring the hole.
3. Level the rig with the four (4) leveling screws using the bubble level
(4125 & 4130 only) as a guide. When the rig is level, tighten the four
(4) nuts (4125 & 4130 only) on the leveling screws.
4. Connect one end of the supplied vacuum hose to the vacuum line
coupler on the vacuum pad. To do this, pull back the collar on the
hose and push the end of the hose onto the coupler until in snaps
into place. Then, connect the other end of the vacuum hose to the
coupler on the vacuum pump following the same procedure.
5. The vacuum pump may be set on a dry surface away from the rig or
mounted to the base of the Dymorig as shown. However, DO NOT
mount the vacuum pump to the Dymorig when angle coring.
To mount the vacuum pump on the Dymorig, place the small hole on
the vacuum pump mounting bracket over the vacuum pad stud on
the Dymorig.
6. Plug the vacuum pump into the power source—the pump will start
automatically. Step on the vacuum pad or the vacuum pad stud until
the vacuum pad lowers and adheres to the work surface.
7. After the pad is secured to at least 20 inches of mercury vacuum,
tighten the vacuum pad nut securely.
Using an Expansion-Type Anchor (Fig. 13)
For Cat. No. 4115 & 4120 only.
Use a 5/8" expansion-type anchor (not supplied) that will accept a 5/8"
threaded rod or bolt to secure the base to the work surface.
1. Remove the rubber gasket from the base.
2. Level the rig with the four (4) leveling screws.
3. Using an expansion-type anchor, insert a threaded rod or bolt through
the slot located in the base of the Dymorig and tighten the bolt or
washer and nut firmly in the anchor following the manufacturer's
instructions.
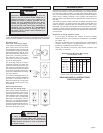
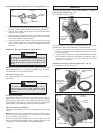
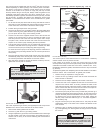
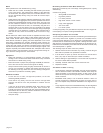
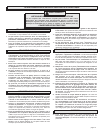
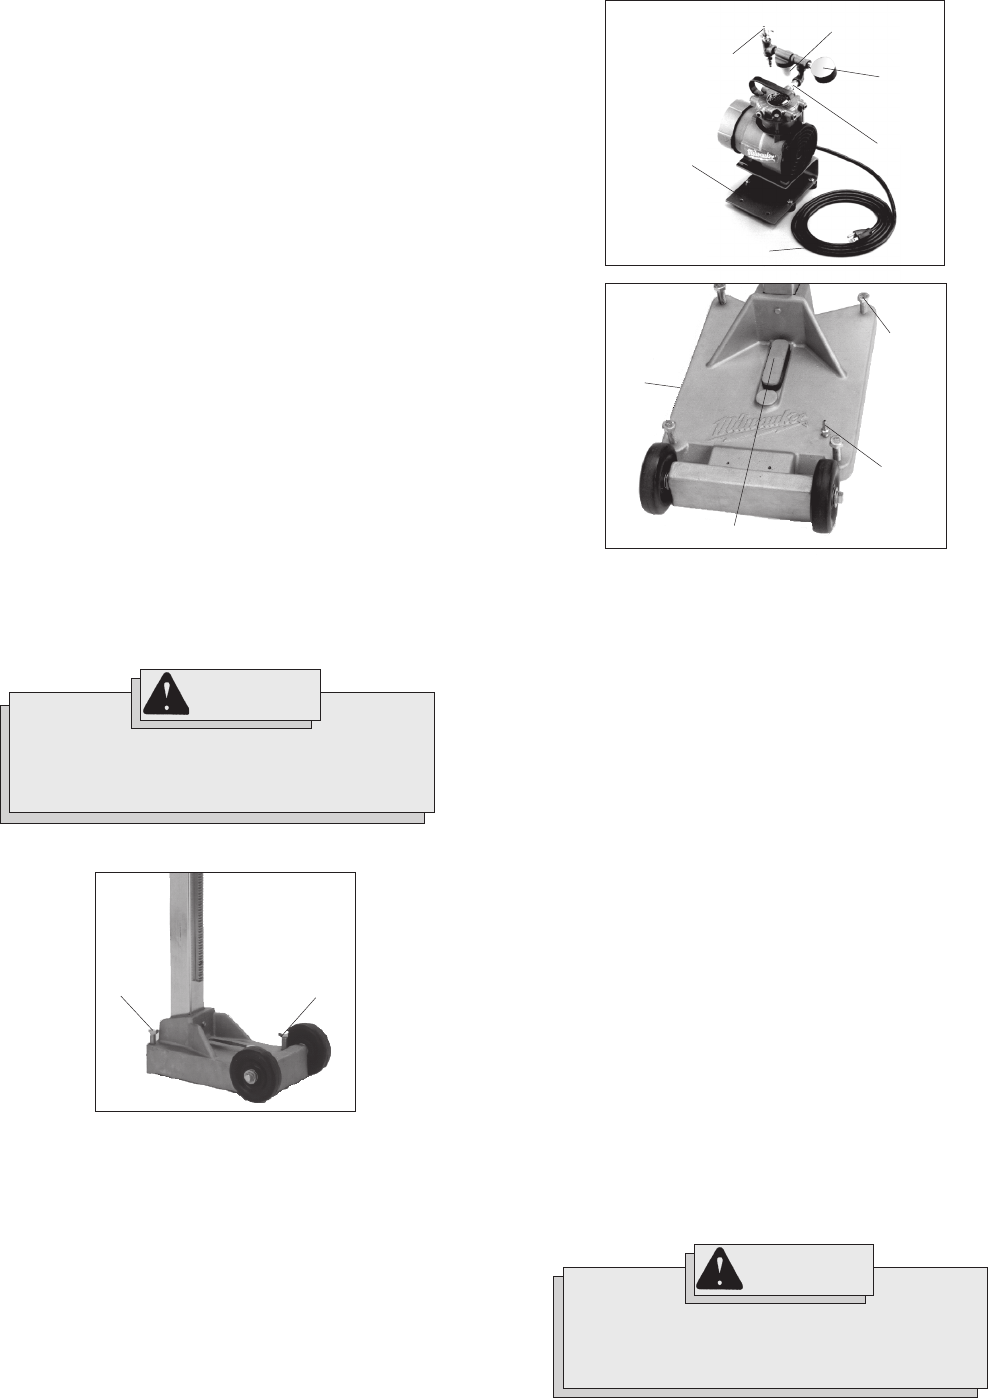
Assembling and Using a Vacuum System (Fig. 14 & 15)
WARNING!
The vacuum gauge must read a minimum of 20
inches of mercury vacuum. To reduce the risk
of injury DO NOT CORE if the gauge reads less
than 20 inches of mercury vacuum.
Leveling
Screws
Vacuum
Line
Coupler
Vacuum Adapter Assembly
Fig. 15
Vacuum
Pad
Gasket
Coupler
Vacuum
Release
Valve
Filter Jar
Vacuum
Gauge
Small Hole for
Attaching
Pump to
Dymorig Stand
Vacuum Hose
Fig. 14
For Cat. No. 4120 only.
The vacuum pad is most effective when it is secured to a relatively
smooth surface such as poured concrete.
If the surface is too porous or rough, the vacuum pad may not hold
securely. Before using the vacuum pad, always check the gasket on the
underside of the base to make sure it isn't worn, cracked or torn. If it is,
immediately replace the gasket, otherwise the vacuum may not hold the
rig securely.
To replace the gasket, see "Replacing Vacuum Pad Gaskets" in the "Main-
tenance" section. See “Accessories" for gasket part number.
1. Position the rig as required for coring the hole.
2. Loosen the four (4) leveling screws until the ends are above the
bottom surface of the base.
3. Place the vacuum adapter assembly into the slot in the base.
4. Connect one end of the supplied vacuum hose to the vacuum line
coupler on the vacuum base. To do this, pull back the collar on the
hose and push the end of the hose onto the coupler until it snaps into
place. Connect the other end of the vacuum hose to the coupler on
the vacuum pump following the same procedure.
5. The vacuum pump may be set on a dry surface away from the rig or
mounted to the base of the Dymorig as shown. To mount the vacuum
pump on the base, place the small holes on the vacuum pump mount-
ing bracket over the two tapped holes on the base. Attach the
vacuum pump to the base with two (2) 1/4" - 20 screws supplied in
the accessory bag.
6. Plug the vacuum pump into the power source - the pump will start
automatically. Step on the base until it lowers and adheres to the
work surface.
7. Tighten the four (4) leveling screws only enough to eliminate rock-
ing. Over-tightening can lift the gasket off the ground and release
the vacuum.