


MQ-WHITEMAN FS2/FS2SP CONCRETE SAW — PARTS & OPERATION MANUAL — REV. #2 (06/26/06) — PAGE 33
FS2/FS2SP CONCRETE SAW — MAINTENANCE
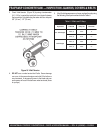
Drive V-Belt Check
Operating the saw with less than four (4) V-belts, or belts that are
slipping
or are Over Tensioned will significantly diminish the
performance of the saw, and may cause damage to the blade.
1. The V-Belts of the FS2/FS2SP have been factory set utilizing
precision standards.
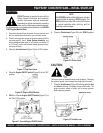
Drive V-Belt(s) Replacement
Reference Pointers and Covers Assembly (page 48), Blade Shaft
Assembly (page 44), Engine Mount Assembly (page 46) for this
operation.
1. Remove the Belt Guard (page 48, item 6), then loosen the
tension of the V-Belts
2. Loosen the Engine Mount Carriage Bolt (page 46, item 7).
3. Loosen the (4) 1 1/2” HHC screws (page 46, item 4).
4. Rotate the engine down to provide slack in the V-Belts.
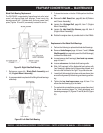
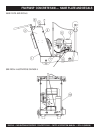
5. Loosen the (2) 3/4” HHC screws that support the Blade Shaft
Bearings on the
right-side
of the saw (page 44, item 11 , also
see Figure 31).
6. Remove the (2) 3/4” HHC screws that secure the Blade Shaft
Bearing on the
V-Belt side
of the saw (page 44, item 11, also
see Figure 31).
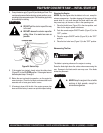
7. Orient the blade shaft so the belt(s) to be replaced can slide
of the blade shaft pulley and engine pulley.
8. Select the proper Multiquip replacement V-Belts (see page
45, item 12).
9. Remove the worn V-Belt(s).
10. Orient the proper replacement V-Belt(s) around the blade
shaft pulley and engine pulley.
11. Replace and tighten the (4) 3/4” HHC screws that secure the
Blade Shaft Bearings to the saw frame.
Adjust V-Belt Tension
1. Tighten down the engine mount
carriage bolt
(page 46,
item 7,) and monitor the tension on the belts.
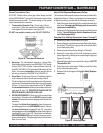
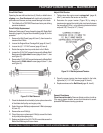
2. Determine the proper tension (Figure 32) by using a
tensionmeter against the inside belts at mid point between
the two pulleys (6-9 lbs.), or by deflecting the center belts at
mid point 3/8” (10 mm) to 1/2” (13 mm).
General Cleanliness
Clean the machine daily. Remove all dust and slurry build up.
If the saw is steam cleaned, ensure that lubrication is accom-
plished AFTER steam cleaning operations.
3. Once the proper tension has been applied to the belts,
tighten the (4) 1-1/2” HHC screws (page 46, item 4).
4. Replace and secure the
Belt Guard
(page 48, item 6).
Figure 32. V-Belt Adjustment/Tension
Figure 31. V-Belt Removal