


9
Northern Industrial Welder
O
p
eratin
g
Instructions and Parts Manual
Flux Core 125
Wire Feed, Gasless Welder
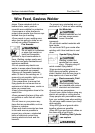
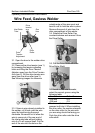
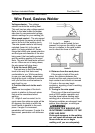
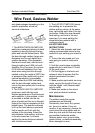
4.2.5 The welder can use either 4” or
8” spools, see the following figure for
additional reference. 8” spool requires
an adaptor. The wing nut controls the
tension on the spool.
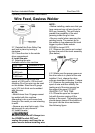
4.2.6. Setting the wire spool tension:
a) Turn the spool of wire with one
hand.
b) Increase the spool tension by
tightening (turn clockwise) the wing
nut while turning the spool. Turn the
spool while tightening the wing nut
until the spool slows down and
operator feels a slight drag.
Stop tightening the wing nut, operator
may need to repeat these steps until
proper spool tension is achieved.
NOTE:
If TOO MUCH tension is applied to
the wire spool, the wire will slip on the
drive roller or will not be able to feed
at all. If TOO LITTLE tension is
applied, the spool of wire will want to
unspool itself when the trigger is
released. Readjust the spool tension
using the wing nut as necessary to
correct for either problem.
4.2.7. With the welder disconnected
from the power source, remove the
leading end of the wire from the spool.
Hold on to it securely, so as not to
allow unspooling or tangling of the
wire as it will result in tangled wire
and lost time.
4.2.8. Cut off any bent portion of the
wire using a wire cutter.
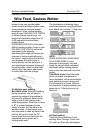
4.2.9. Loosen the tension adjusting
knob holding the drive tension arm in
place and lift the tension arm up off
the drive roller.
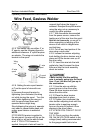
4.2.10. Insert the wire into the inlet
guide tube, feed it across the drive
roller and into the torch assembly
about six inches.
• Make certain that the welding
wire is actually going into the torch
liner. If not, the wire will jam up in
the mechanism.
4.2.11 Line the wire up with the
correct groove in the drive roller.
Place the drive tension arm back
above the drive roller.
4.2.12 Place the drive tension
adjustment arm back in place.
4.2.13 Tighten (turn clockwise) the
drive tension adjusting knob until the
tension roller is applying enough
force on the wire to prevent it from
slipping in the drive rollers.
4.2.14. NOW YOU CAN LET GO OF
THE WIRE.
4.2.15. Plug in and turn the welder
ON. Set the VOLTAGE switch to the
voltage (heat) setting recommended
for the gauge metal that is to be
4” wire
spool
8” wire
s
p
ool
8” spool
Adaptor
Wing
nut