


10
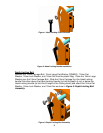
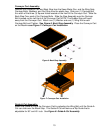
Conveyor Cart Assembly:
Remove the Conveyor Cart and Back Stop from the Saws Water Pan, and the Wing Nuts,
Carriage Bolts, Washers, and Cart Stop from the plastic bag. Slide one (1) Carriage Bolt
thru each of the three (3) Square Holes located on the front of the Conveyor Cart. Slide the
Back Stop Over each of the Carriage Bolts. Slide the Stop Assembly over the Carriage
Bolt Located on the Left front of the Conveyor Cart NOTE: The Rubber Stop will faces
away from the Conveyor Cart. Attach one (1) Washer and one (1) Wing Nut to each
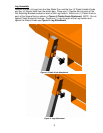
Carriage Bolt and Tighten. See Figure 6: Back Stop Assembly. Place the Conveyor Cart
on the Machine see Figure 7: Conveyor Cart Installation.
Figure 6: Back Stop Assembly
Figure 7: Conveyor Cart Installation
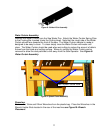
Guide-A-Cut Assembly:
Attach the Guide-A-Cut to the Conveyor Cart by adjusting the Wing Bolt until the Guide-A-
Cut can slide over the Black Stop. The Guide-A-Cut will work as a Rip Guide that is
adjustable for 90° and 45° cuts. See Figure 8: Guide-A-Cut Assembly.