


8
2HP Super Dust Gorilla Owners Manual
O.A.S. 2007
c
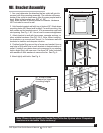
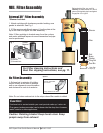
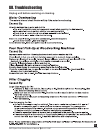
VII. Bracket Assembly
1. You must determine the direction the fan outlet will point to
proceed with this mounting assembly. The collector will seem
quieter if the outlet is aimed away from the area people tend to
work. Slots in the brackets are .406 x 1.00
Note: Bolts included to mount bracket to collector. Hardware
NOT included to mount to wall.
2. Hold bracket against wall with top of plate at 56. Mark where
mounting holes fall. Mount wall bracket. For wall mounting, the
bolt centers on the brackets are at 16to accomodate most wall
stud spacing. See Fig. 1 & 2. Use a Level to ensure straightness.
3. Attach bracket to wall with lag screws, concrete anchors, or
other suitable hardware. See Fig. 2 & 3. Note: When installing
the brackets on a concrete wall, mount 2 x 4s between wall and
brackets to stabilize and dampen vibration.
4. Position Angle Ring around top of cone over bracket. Line up
one hole in Ring with hole in each bracket at desired rotation of
outlet. If rotation you desire does not correspond to an existing
hole in Angle Ring, drill new ones. Use three 3/8 bolts (included)
with washers & lock washers to secure the fan. See Fig. 4.
5. Attach tightly with bolts. See Fig. 4.
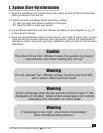
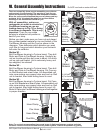
Note: Please do not install an Oneida Dust Collection System alone. Competent
assistance is advisable. Units are heavy!
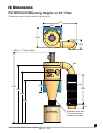
56 to top of plate.
Distance tor minimum
mounting height.
4
1
.406 x 1.00
16
12 Ga.
2
3
Level
24.25
16