


14 Pelco Manual C573M-D (11/03)
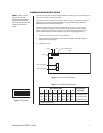
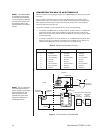
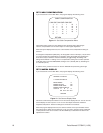
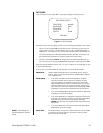
Figure 8. CM9760-MDA Keyboard Wiring
2
3
4
5
6
7
18
KBD200A
25-FOOT KEYBOARD
DATA CABLE
COM1
12 VAC
TX–
TX+
KBDKIT OR
KBDKIT-X
FROM PIN 8
FROM PIN 7
PIN
8
HOLD WITH
LOCKING CLIP
ON BOTTOM
CHECK WIRE COLORS DETAIL
RJ-45 PLUG
PIN 7
PIN
1
TO WALL BLOCK
TERMINALS
NOTE:
Always replace
blown fuses with fuses of
the same rating. Failure to
do so could result in serious
damage to the unit.
Keyboard Wiring
Refer to Figure 8.
1. Use the supplied keyboard data cable to connect the keyboard to the RJ-45 jack on
the wall block.
2. Remove the RJ-45 plug from one end of a second keyboard data cable and strip the
cable jacket back 2 inches (5 cm).
3. Hold up the end of the cable that has the RJ-45 plug still attached and examine the
wire colors going to each pin. (Refer to the “check wire colors” detail in Figure 8.)
Make note of the colors going to pins 7 and 8.
4. Connect the stripped wires to the wall block as follows:
Wire from RJ-45 pin 8 to wall block terminal 1;
Wire from RJ-45 pin 7 to wall block terminal 2;
Cut the unused wires back to the cable jacket.
5. Plug the RJ-45 end of the second (modified) keyboard data cable into the COM1 port
on the master distribution amplifier.
6. Plug the KBDKIT or KBDKIT-X into a suitable outlet.
POWER CONNECTIONS
The MDA’s rear panel contains a three-pronged 120 VAC receptacle. Use the supplied
power cord to connect the MDA to a power source.