


18 Pelco Manual C573M-D (11/03)
SET CABLE COMPENSATION
If you choose item 2 on the Main Menu, the program displays the following menu:
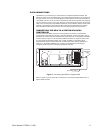
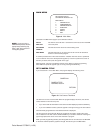
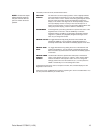
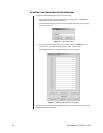
CABLE COMPENSATION
CAM CMP CAM CMP CAM CMP
11 7 1 121
21 8 1 132
31 9 1 143
41 101 154
51 111 161
61 121
RETURN
Figure 11. Set Cable Compensation Menu
Transmitting video signals over long distances can adversely affect video images.
However, compensation can be used to adjust for video signal degradation.
When the system displays the menu, the cursor flashes on the compensation setting for
camera 1.
To change the compensation (CMP) entry, use the joystick to move to the input (1-16) for which
you want to change the compensation. For example, moving the joystick down positions the
cursor at the entry for camera 2. Press the OPEN key to toggle through the settings. The
settings are numbered 1-4. Setting 1 is for no compensation, setting 2 is for a video input that
is 500 feet (152 m) from the CM9760-MDA, setting 3 is for 1,000 feet (304 m), and setting 4 is
for 1,500 feet (457 m).
To exit the menu, position the cursor on the R in RETURN and press the joystick right.
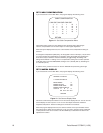
SET CAMERA DISPLAY
If you choose item 3 on the Main Menu, the program displays the following menu:
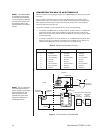
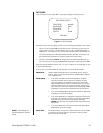
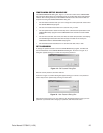
CAMERA 01 DISPLAY
1.POSITION DISPLAY
BRIGHTNESS: 8
ENABLE TITLES: ON
ENABLE TIME DATE: ON
ENABLE VIDEO DISPLAY
OUTPUT: A B C D
ON OFF ON OFF
RETURN
Figure 12. Set Camera Display Menu
This menu contains setup information for how the camera display will look. You can turn the
camera display for each output on or off. You can also adjust and set the characters’
brightness and position. These two settings are universal for all cameras.
When the program displays this menu, the camera number on the top line flashes. Press
the joystick right to select the next camera if you do not want to program output, brightness,
or text position for the current camera. Use the OPEN key to select the three items to be
adjusted on this menu.