


12 © 2006 Pioneer Supply International
12 © 2006 Pioneer Supply International © 2006 Pioneer Supply International 13
Figure 6
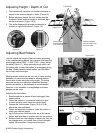
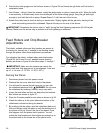
Figure 8
!
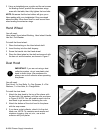
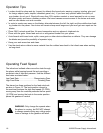
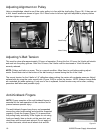
Figure 7
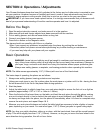
3 Using a straightedge as a guide and the set screws
for leveling control, position the extension wings
even with the table, then fully tighten the hex bolts.
NOTE: Be aware that the bed rollers will give you a
false
reading with your straightedge if they are raised
above the table. Move them down or work around them
when leveling the extension wings.
Hand Wheel
You will need:
Hand wheel, Hand wheel Bushing, Hand wheel Handle,
Hex Nut, Flat Washer
To install the Hand wheel:
1 Place the bushing on the Hand wheel shaft.
2 Insert the key into the shaft keyway.
3 Screw the handle into the Hand wheel.
4
Place the Hand wheel on the shaft and secure it with
the hex nut and flat washer, as shown in Figure 7.
Dust Hood
IMPORTANT: If you are not using a dust
collection system, do not use plastic dust
hood to direct chips. We reccomend to
always use a dust collector when operating
this planer.
You will need:
Dust Hood, 3 x Hex Bolts, 3 x Cap Screws, 6 x Flat
Washers, 3 x Hex Nuts, 6 x Flange Bolts
To install the dust hood:
1 Attach the dust hood to the top of the planer with
the hex bolts, flat washers, and hex nuts as shown
in Figure 8. NOTE: You will need to reach into the
dust hood to get access for fastening the nuts.
2 Attach the bottom of the dust hood to the planer
with the cap screws.
3 If you have a dust collector, attach it to the dust
hood now. NOTE: To maximize work results and
minimize clogging, chip out, etc., use a dust
collector with your planer.