


9
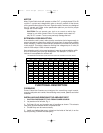
To obtain the best finish, start with a “COARSE” grade of abrasive and
change to “MEDIUM” and “FINE” grades as work progresses.
A wide range of available PORTER-CABLE Sanding Belts are listed in the
back of the manual. It is recommended that you keep a full assortment on
hand so you will always have the correct belt for any job you may encounter.
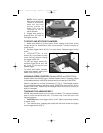
GENERAL SANDING
1. CAUTION: SECURE WORK and maintain a FIRM GRIP on sander.
Friction between sanding belt and work will try to move the work backwards
and the sander forwards.
2. CAUTION: ALWAYS be sure switch is OFF before connecting sander to
power circuit.
3. HOLD SANDER OFF the work and start motor.
4. LOWER SANDER TO WORK, letting the rear part of the belt touch first.
Level the machine as it is moved forward.
5. GUIDE the machine over the work in overlapping strokes allowing the
sander to do the work.
6. AVOID applying excessive pressure when sanding. The weight of the
machine is usually sufficient for a fast smooth finish. A slight increase in
pressure may speed removal of material, while too much pressure will slow
the motor and decrease removal.
7. WORK BACK and FORTH over a fairly wide area to obtain an even
surface.
8. DO NOT let the machine tilt or the edge of the belt will make a deep cut
into the surface.
9. DO NOT PAUSE in any one spot during the sanding operation because
the belt will quickly remove material making the surface uneven.
10. LIFT SANDER FROM WORK BEFORE TURNING OFF MOTOR.
11. ALWAYS be sure motor has completely stopped before setting sander
down.
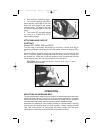
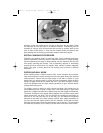
FAST SANDING ON ROUGH WORK
To smooth a rough surface quickly, use a coarse grit abrasive belt. With the
belt positioned diagonally across the grain, move the sander in the direction
of the grain as shown in Fig. 5. Overlap the strokes well and cover the entire
surface, working from both sides of the board. That is, once with the sander
angled to the left and once angled to the right. Smooth the surface by
guiding the sander back and forth with the grain. Change the belt to a
medium grit and follow the same procedure. Finish off by thoroughly working
over the grain lengthwise. Change again to a fine grit and work entirely back
and forth with the grain. Always finish your work by sanding with the grain.
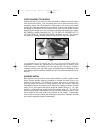
REMOVING OLD PAINT AND VARNISH
CAUTION: Read and follow ADDITIONAL SAFETY RULES FOR
PAINT REMOVAL section of this manual.
Your sander is an excellent tool for removing old paint and varnish from flat
surfaces. Two problems are common to such work. One is loading the
abrasive with the material being removed and the other is overheating the
paint or varnish by working too long in one place. Use a coarse grit open
coat abrasive belt and a single stroke action to overcome the loading
899713 - 04-12-02.qxd 9/23/02 1:50 PM Page 9