


3
ADDITIONAL SAFETY RULES FOR CIRCULAR SAWS
1. DO NOT operate your saw until it is completely
assembled and installed according to the instructions.
2. IF YOU ARE NOT thoroughly familiar with the
operation of circular saws, obtain advice from your
supervisor, instructor, or other qualified person.
3. ALWAYS use blade guard, spreader and anti-
kickback fingers for every operation for which it can be
used, including all through sawing.
4. ALWAYS hold the work firmly against the miter gage
or fence.
5. NEVER use the fence as a cut-off gage when cross-
cutting.
6. MOVE the rip fence out of the way when cross-
cutting.
7. NEVER perform any operation “free-hand” which
means using only your hands to support or guide the
workpiece. Always use either the fence or miter gage to
position and guide the work.
8. ALWAYS use a push stick for ripping narrow stock.
Refer to ripping applications in instruction manual where
the push stick is covered in detail.
9. AVOID KICKBACKS (work thrown back toward you)
by:
A. Keeping blade sharp.
B. Keeping rip fence parallel to the saw blade.
C. Keeping spreader and anti-kickback fingers and
guard in place and operating.
D. Not releasing the work before it is pushed all the
way past the saw blade.
E. Not ripping work that is twisted or warped or does
not have a straight edge to guide along the fence.
F. Making sure that the fence is properly aligned.
G. Always using the fence, miter gauge or fixture to
process work pieces.
H. Using feather boards or a fixture when the anti-
kickback device cannot be used.
I. Keeping control of the stock when manually
feeding.
J. Not attempting to saw stock that is too large to
safely control.
K. Not using the fence as a stop when crosscutting.
L. Not trying to saw stock with loose knots or other
flaws.
10. AVOID awkward operations and hand positions
where a sudden slip could cause your hand to move into
the cutting tool.
11. ALWAYS keep hands and fingers away from the
blade.
12. NEVER stand or have any part of your body in line
with the path of the saw blade.
13. NEVER reach behind or over the cutting tool with
either hand for any reason.
14. DIRECTION OF FEED. Feed work into blade or
cutter against the dir
ection of rotation of the blade or
cutter only.
15. DO NOT feed the material too fast while cutting.
Feed the material just fast enough so that the blade will
cut.
16. NEVER attempt to free a stalled saw blade without
first turning the saw “OFF.”
17. NEVER start the saw with the workpiece pressed
against the blade.
18. MAKE sure table is clear of all objects before turning
saw “ON”.
19. ALWAYS turn the saw “OFF” and wait for the blade
to stop before removing scarp pieces.
20. NEVER perform layout, assembly or set-up work on
the table while the saw is operating.
21. PROVIDE adequate support to the rear and sides of
the saw table for wide or long workpieces.
22. NEVER use solvents to clean plastic parts. Solvents
could possibly dissolve or otherwise damage the
material. Only a soft damp cloth should be used to clean
plastic parts.
23. SHOULD any part of your circular saw be missing,
damaged, or fail in any way, or any electrical
components fail to perform properly, shut off switch and
remove plug from power supply outlet. Replace missing,
damaged or failed parts before resuming operation.
24. THE USE of attachments and accessories not
recommended by Porter-Cable may result in the risk of
injuries.
25. ADDITIONAL INFORMATION regarding the safe
and proper operation of this product is available from
the National Safety Council, 1121 Spring Lake Drive,
Itasca, IL 60143-3201, in the Accident Prevention
Manual for Industrial Operations and also in the Safety
Data Sheets provided by the NSC. Please also refer to
the American National Standards Institute ANSI 01.1
Safety Requirements for Woodworking Machinery and
the U.S. Department of Labor OSHA 1910.213
Regulations.
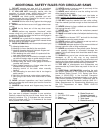
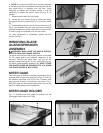
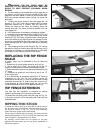
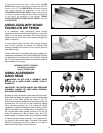
UNPACKING
Your new saw is shipped complete in one container.
Carefully unpack the saw and all loose items from the
shipping container. Fig. 2 illustrates the saw removed
from the container and Fig. 3, illustrates all the loose
items packed with the saw.
Fig. 2
Fig. 3
1 - Handle
2 - 1/4"-20x1-3/4" screw
3 - Fence
4 - Miter Gage
5 - Blade Guard and
Spreader Assembly
6 - Anchor Block Shim (3)
7 - Table Insert
8 - Blade Wrench (2)
1
2
3
4
5
6
7
8