


11
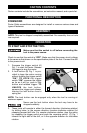
DRIVING SELF-DRILLING/TAPPING SCREWS –
MODELS 4640
NOTE: Maximum size screws for use with this tool are #12 wood screws and 1/4"
self-drilling/tapping screws.
These screws drill and tap their own hole as they are driven. This differs from
self-tapping screws in that pre-drilled holes for tapping are not required. To drive
these screws:
1. Install the proper nutsetter that fits the screw to the screwdriver.
2. Set the screwdriver for the correct rotation.
3. Start the screwdriver and insert the head of the screw in the nutsetter.
Do not exert pressure on the screw while performing this operation.
4. Place the end of the screw in the desired location and remove your fingers.
5. Apply forward pressure to drive screw until depth stop rests on the surface
of the work. Adjust the depth stop so that the fastener head seats firmly on
the work. Avoid seating the fastener too deep to prevent shearing off the
head.
TO REMOVE SCREWS – ALL MODELS
1. Remove the Depth Stop Assembly.
2. Install a proper bit that fits the screw.
3. Set the screwdriver for reverse rotation.
4. Place the bit on the screw and apply forward pressure.
5. Start the screwdriver.
For assistance with your tool, visit our website at www.porter-cable.com for a
list of service centers or call the Porter-Cable help line at 1-800-487-8665.
TROUBLESHOOTING
MAINTENANCE
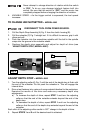
CHECK CLUTCH CONDITION
DISCONNECT TOOL FROM POWER SOURCE.
Periodically, check the screwdriver
clutch jaws for wear by removing the
screwdriver mechanism housing (A)
Fig. 5 from the power unit.
A
Fig. 5