


12
DRIVING SELF-TAPPING SCREWS
1. Drill pilot hole of correct size as recommended by screw manufacturer for
fastener being used.
2. Install proper bit that fits screw to screwdriver.
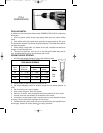
3. Set torque adjusting collar for desired torque and set speed selector to
LOW.
4. Set screwdriver for correct rotation.
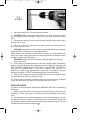
5. Position bit in head of screw.
6. Place end of screw into pre-drilled hole, remove fingers, start screwdriver
and drive screw.
7. As soon as screw has seated, lift screwdriver from screw.
DRIVING MACHINE SCREWS
1. Drill and tap correct hole size for fastener to be used.
2. Start screw in hole with fingers and drive as outlined under DRIVING
WOOD SCREWS.
TO REMOVE SCREWS
1. Set torque adjusting collar for maximum torque and set speed selector to
LOW.
2. Install proper bit that fits screw to screwdriver.
3. Set screwdriver for reverse rotation.
4. Place bit in screw and start drill to remove screw.
MAINTENANCE
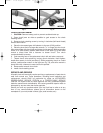
KEEP TOOL CLEAN
All plastic parts should be cleaned with a soft damp cloth. NEVER use
solvents to clean plastic parts. They could very possibly dissolve or otherwise
damage the material.
FAILURE TO START
Should your tool fail to start, make sure battery pack is charged and properly
installed in drill.
BATTERY
The battery pack will discharge by itself without damage if stored for long
periods of time, and may require recharging before use.
LUBRICATION
For your continued safety and electrical protection, lubrication and service on
this tool should ONLY be performed by an AUTHORIZED PORTER-CABLE
SERVICE STATION or a PORTER-CABLE SERVICE CENTER.
At approximately 100 hours of use, take or send your tool to your nearest
Authorized Porter-Cable Service Station to be thoroughly cleaned and
inspected; worn parts replaced, when necessary; relubricated with fresh
lubricant, and performance tested.
900469 - 11-30-00.QXD 9/25/02 11:26 AM Page 12