


8
OPERATION
CHARGING THE BATTERY PACK GENERAL
Before using your cordless Driver/Drill for the first time, the battery pack
should be fully charged. If the battery pack is installed in the Driver/Drill,
remove it by following instructions under INSTALLING OR REMOVING
BATTERY PACK.
As a battery pack approaches the discharged state, you will notice a sharp
drop in tool performance. When the tool is unable to perform the task at hand,
it is time to recharge the battery pack. Recharging the battery pack before this
condition is reached will reduce the total work life of the pack. Discharging the
pack beyond this point can damage the pack.
NOTE: Battery temperature will increase during and shortly after use.
Batteries may not accept a full charge if they are charged immediately
after use. Allow the battery pack to cool to room temperature before
charging for best results.
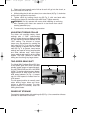
The battery charger may rest on the four pads provided on the bottom of the
case or be mounted on a wall by utilizing the two key hole slots provided.
CAUTION: Vent slots in top and bottom of charger must not be
obstructed. Do not charge battery when temperature is BELOW 32°F
or ABOVE 104°F.
NORMAL CHARGING
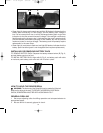
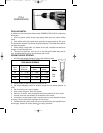
Make sure power circuit voltage is the same as that shown on the charger
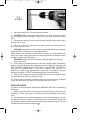
specification plate. Connect charger to power source. The green light (A) Fig.
5, should begin to flash. This indicates the charger is ready to begin charging.
Position the battery pack on charger, align rails (A) Fig. 6 on battery pack with
four tabs (C) Fig. 5 on charger. Slide battery forward onto charger until it stops.
The green light (A) Fig. 5, should begin to glow continuously, indicating that
the battery pack is receiving a “Fast Charge” (if the green light does not glow
continuously, or if the red light (B) Fig. 5, also begins to flash: see
DIAGNOSTICS). After approximately one hour, the “Fast Charge” indicator
light should go out indicating that the battery pack is fully charged and that
the charger is now in a “Trickle Charge” mode. The battery pack can be left
on “Trickle Charge” until you are ready to use it.
Depending on room temperature, line voltage, and existing charge level, initial
battery charging may take longer than one hour.
Disconnect charger from power source when not in use.
DIAGNOSTICS
The Model 8624 Charger is equipped with a diagnostic system that
automatically checks the battery pack each time a pack is inserted into the
charger. If no problems are found, the charger will automatically switch to
“Fast Charge” mode as described in NORMAL CHARGING. If a problem is
found, it will be indicated by the charger indicator lights (see Fig. 5), as follows:
• Green light (A) continues to flash after battery pack is inserted in charger:
indicates that the battery pack temperature is either too high or too low for
charging. If left alone, the charger will continue to monitor the battery pack
temperature and will begin charging when the temperature reaches an
acceptable level.
900469 - 11-30-00.QXD 9/25/02 11:26 AM Page 8