


14 - ENGN000732
TO DRAIN TANK
Risk of Unsafe Operation. Risk from noise. Air tanks contain
high pressure air. Keep face and other body parts away from outlet of drain.
Use ANSI Z87.1 eye protection (CAN/CSA Z94.3) when draining as debris
can be kicked up into face. Use ear protection [(ANSI S12.6 (S3.19) hearing
protection] as air flow noise is loud when draining.
1. SettheOn/Offswitchto"Off".
2. Turn the regulator knob counter-clockwise to set the outlet pressure to zero.
3. Removetheairtooloraccessory.
4. Pull ring on safety valve allowing air to bleed from the tank until tank pressure
isapproximately20psi.Releasesafetyvalvering.
5. Drain water from air tank by opening drain valve on bottom of tank.
Risk of Bursting. Water will condense in the air tank. If not
drained, water will corrode and weaken the air tank causing a risk of air tank
rupture.
Risk of Property Damage. Drain water from air tank may con-
tain oil and rust which can cause stains.
6. Afterthewaterhasbeendrained,closethedrainvalve.Theaircompressor
can now be stored.
NOTE: If drain valve is plugged, release all air pressure. The valve can then be
removed, cleaned, the reinstalled.
SERVICE AND ADJUSTMENTS
ALLMAINTENANCEANDREPAIROPERATIONSNOTLISTEDMUSTBE
PERFORMEDBYTRAINEDSERVICETECHNICIAN.
Risk of Unsafe Operation. Unit cycles automatically when
power is on. When servicing, you may be exposed to voltage sources,
compressed air, or moving parts. Before servicing unit unplug or disconnect
electrical supply to the air compressor, bleed tank of pressure, and allow the
air compressor to cool.
TO REPLACE OR CLEAN CHECK VALVE
1. Releaseallairpressurefromairtank.See"ToDrainTank"intheMaintenance
section.
2. Unplug unit.
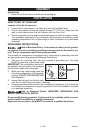
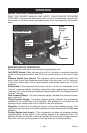
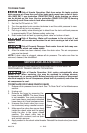
3. Remove the hose by removing the
Check
Valve
Hose
Clamp
hose clamp. NOTE: The hose clamp
is not reusable. You must purchase a
new hose clamp, purchase a standard
hose clamp at a local hardware store.
4. Unscrew the check valve (turn coun-
ter-clockwise) using a socket wrench.
5. Makesurethevalvediscmovesfreely
inside the check valve and the spring
holds the disc in the upper, closed
position. The check valve may be
cleaned with a solvent, such as paint
and varnish remover.
6. Applysealanttothecheckvalvethreads.Reinstallthecheckvalve(turnclock-
wise).