


18-ENG
2. Remove beltguard.
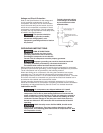
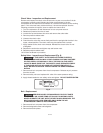
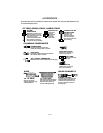
3. Place a straight edge (such as a ruler) against the outside of the flywheel and
measure the distance from it to the nearest groove. Alignment is achieved when
the other end of the straight edge is within 1/32” of the measured dimension at
the pulley grooves.
If the pulleys are not aligned:
a. Loosen the motor pulley set screw.
b. Slide pulley until alignment is achieved.
c. Tighten pulley set screw to 70-80 inch pounds.
4. Replace beltguard and tighten beltguard screws securely.
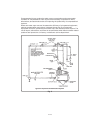
Servicing Intake and Exhaust Valves
1. Remove and lock out power from compressor and relieve all air
pressure from the air tank.
2. Remove belt guard as noted in "Belt Guard - Removal and
Installation" in this manual.
3. Remove the air filter assembly.
4. Disconnect the pressure release and outlet tubes from the air
compressor.
5. Remove the hardware securing the cylinder head and remove the cylinder head
and valve plate.
MANY SOLVENTS ARE HIGHLY FLAMMABLE AND A
HEALTH HAZARD IF INHALED. ALWAYS OBSERVE THE SOLVENT
MANUFACTURER'S SAFETY INSTRUCTIONS AND WARNINGS.
6. Clean carbon deposits in head cavities and valve plates with
lacquer thinner or other suitable solvent.
7. Clean the intake and exhaust valves with lacquer thinner or
other suitable solvent. Inspect valves; replace if necessary.
NOTE
Do not use gasket cement on any gasket surface as this may clog
compressor valve cavities and air flow areas.
8. Reinstall valve plate and gaskets.
9. Install the cylinder head. Snug mounting screws and studs tight, then torque to
25 to 30 foot pounds starting at the center and working toward the outside.
10.Reconnect the pressure release and outlet tubes to the compressor pump.
11.Replace air filter assembly.