


24
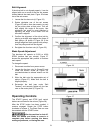
2. Draw a line on the board parallel with the
jointed, or straight edge of the board.
3. Move the band saw fence out of the way,
and carefully make a freehand cut along
your drawn line on the board. Stop about
midway on the board, and shut off the band
saw (allow the blade to come to a complete
stop) but do not allow the board to move.
4. Clamp the board to the table.
5. Slide the band saw fence over against the
board until it contacts the straight edge of
the board at some point. Lock the fence
down.
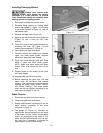
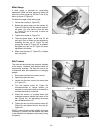
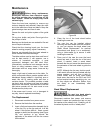
6. Loosen the four hex cap screws at the top of
the fence (see Figure 3) and shift the fence
until it is parallel to the board along its
length.
7. Re-tighten the four hex cap screws.
NOTE: Skewing the fence to correct blade lead
is effective for that particular blade; when a new
blade is installed, the fence will probably need
re-adjustment.
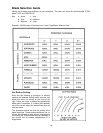
Blade Selection
Using the proper blade for the job will increase
the operating efficiency of your band saw, help
reduce necessary saw maintenance, and
improve your productivity. Thus, it is important to
follow certain guidelines when selecting a saw
blade.
Here are factors to consider when selecting a
blade:
• The type of material you will be cutting.
• The thickness of the workpiece.
• The features of the workpiece, such as
bends or curves with small radii.
These factors are important because they
involve basic concepts of saw blade design.
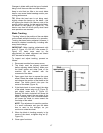
There are five (5) blade features that are
normally changed to meet certain kinds of
sawing requirements. They are:
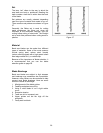
1. width
2. pitch (number of teeth per inch)
3. tooth form (or shape)
4. the “set” of the teeth
5. the blade material itself