


25
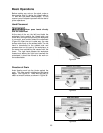
Beveling
Beveling an edge is the same operation as edge
jointing, except that the fence is tilted to a
specified angle.
Make certain that the material being beveled
is over 12 inches long, more than 1/4 inch
thick and 1 inch wide.
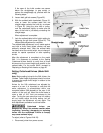
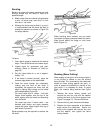
Although the fence may be tilted in or out, it
is recommended that the fence be tilted in
toward the operator (as shown in Figure 39)
for safety reasons.
Figure 39
To bevel:
1. Use a bevel gauge to determine the desired
angle. Then set the fence to the same angle.
2. Inspect stock for soundness and grain
direction (Refer to Direction of Grain on
page 23).
3. Set the infeed table for a cut of approxi-
mately 1/16.
4. If the board is bowed (curved), place the
concave edge down on the infeed table.
5. Feed the stock through the cutterhead,
making sure the face of the stock is
completely flat against the fence and the
edge is making solid contact on the infeed
and outfeed tables (Figure 39).
For wood wider than 3 inches – hold with
fingers close together near the top of the
stock, lapping over the board and extending
over the fence.
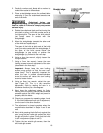
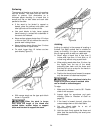
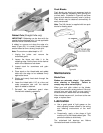
For wood less than 3 inches wide – use
beveled push blocks and apply pressure
toward the fence. Keep fingers near top of
push block (Figure 40).
Several passes may be required to achieve the
full bevel.
Figure 40
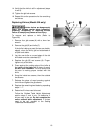
When beveling short material use one bevel
hold down and apply pressure toward the fence.
Keep thumb above the ledge on hold down
block (Figure 41).
Figure 41
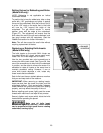
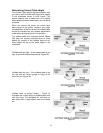
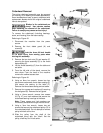
Skewing (Shear Cutting)
When edging or facing burl or birds-eye maple, it
is not unusual to deface or mar the surface
being finished. This is caused by the cutterhead
blades at times cutting against the grain. In
order to prevent the defacing or marring of this
type wood, it is necessary to skew, or angle
finish, the material being worked (see Figure
42).
1. Release the fence locking handle and
remove the two hex nuts and flat washer
holding the fence to the fence support (see
Figure 3 on page 10). Remove the fence.
2. Remove the key from the fence slide base.
3. Replace the fence assembly at the desired
angle across the cutterhead. Secure the
fence to the support with the two hex nuts
and flat washer, then tighten the fence
locking handle.