


6
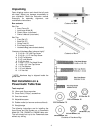
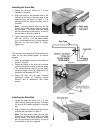
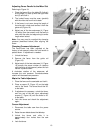
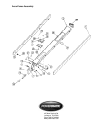
Referring to Figure 5:
3. Secure the back rail (A) to the pre-tapped
holes in the saw table (B) in two places with
5/16-18 x 7/8 hex cap screws (C), 5/16 lock
washers (D), and 5/16 flat washers (E).
Finger tighten only.
4. Use the adjustable square to measure at
several points along the rail to achieve
parallel with table. Tighten screws securely
with a 12mm wrench.
Important: If you are installing an optional wood
extension table on your saw, it should be
installed first before mounting the guide tube.
This will prevent having to mount and align the
guide tube twice.
If you are not mounting an optional wood table,
proceed to Installing the Guide Tube on page 8.
Installing the Wood Extension Table
The wood extension table is an optional
accessory.
Tools required:
Electric drill
Philips screwdriver
10mm and 12mm wrenches
Four clamps
Straight edge
Hammer (or rubber mallet)
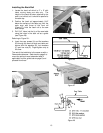
Installing the Legs
Legs are optional accessories. If your wood
table does not require legs, proceed to
“Installing the Table.”
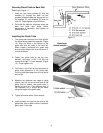
1. Place the optional wood extension table
upside down. (Use a mat or cloth to protect
the surface). Position the legs at the inside
corners of the wood table at the end where
the Powermatic logo is placed. See Figure
6.
Note: If you are using a mobile base under
your saw, you may need to shift the
placement of the legs so that they rest
properly upon the shelves of the base.
2. Drill pilot holes, making sure not to drill
completely through the table and sides.
3. Secure with the eight screws provided.
4. Turn the wood table right-side up.
5. The footpads on the legs can be rotated to
help level the wood table with the saw
during the following procedure. Tighten the
nut against the end of the leg to secure a
footpad’s position.
Figure 5
Figure 6