


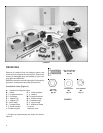


11
7. Attach two of the support legs to the front of the
machine. See Figure 9. The bottom of the support
leg is slotted and mounts to the pre-tapped holes in
the base with two screws and two flat washers. Do
not tighten yet.
The top of the support leg mounts to the housing with
two screws, four flat washers, and two nuts.
Use the slots at the bottom of the support leg for ad-
justment if needed, then tighten all screws and nuts.
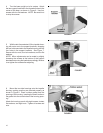
8. Attach the two rear support legs as follows:
The bottom of the support leg is slotted and mounts to
the pre-tapped holes in the base with two screws and
two flat washers. Do not tighten yet.
The top of the support leg mounts to the holes in the
housing, with a hanger bracket placed in between, as
shown in Figure 10.
Make any necessary adjustments using the slots at
the bottom of the support leg, then tighten all screws
and nuts.
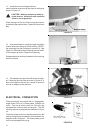
9. Screw the lower hanger onto the threads of the
upper hanger, as shown in Figure 11. A flat has been
placed on the lower hanger for use of a wrench to help
in the attachment.
10. Place the two hanger assemblies into the hanger
brackets on the back of the housings, as shown in
Figure 12. The "hooks" should face to the front.
FIGURE 9
FIGURE 10
FIGURE 11
FIGURE 12