


10
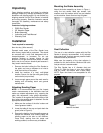
Replacing Abrasive Disc
The DS20 accepts standard 20” diameter cloth or
paper-back sanding discs. We recommend 60 grit
for coarse or rough sanding, 80 grit for general
purpose medium duty sanding, and 100 grit for fine
sanding.
1. Lower the table as far as possible, and push
back the guard. See Figure 6.
2. Use a putty knife to remove the old abrasive
from the disc. Clean the disc with solvent and
allow it to dry.
3. Mount the new sanding paper. Sanding paper
is available in various forms, such as adhesive
backed discs and pressure-sensitive discs.
4. Raise the table, and pull the guard back over
the disc before operating the sander.
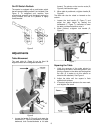
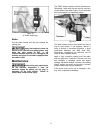
Miter Gauge
The miter gauge is equipped with individually
adjustable index stops at 90 degrees and 45
degrees right and left. The index stops can be
adjusted by loosening the hex nut (G, Figure 9)
and turning the screw (H, Figure 9).
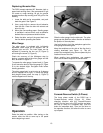
Check the accuracy of the 90-degree stop by
placing a square against the miter gauge and the
disc, as shown in Figure 10.
To operate the miter gauge, loosen knob (J, Figure
9) and move the body of the miter gauge (K, Figure
9) to the desired angle. Re-tighten knob before
sanding operation.
The miter gauge body is set to stop at 0 degrees
and 45 degrees left or right. To move the gauge
body beyond these points, the stop (L, Figure 9)
must be flipped out of the way.
Figure 9
Operation
Raise the table into position. After turning on the
sander, allow the disc to come up to full speed
before beginning to sand.
Figure 10
Slide the miter gauge into the table slot. The miter
gauge can be used from either direction to facilitate
the position of the workpiece.
Use both hands to hold the workpiece against the
miter gauge and sanding disc.
Keep the workpiece on the side of the disc that is
rotating downward (see Figure 11). This will
prevent the workpiece being thrown upward by the
rotational force of the disc.
When sanding long workpieces, use supports
which are the same height as the sander table.
Figure 11
Forward-Reverse Switch (3-Phase)
The three phase model of the DS20 has a
Forward-Reverse switch (Figure 12). When
changing direction with the Forward-Reverse
switch, turn the lever to the OFF position and allow
the disc to come to a complete stop. (Use the
brake for immediate stop). Then turn the lever to
the opposite direction, and allow the disc to come
up to speed.