


12
5. Unlock the nut (NOTE: Left hand threads –
loosen by turning clockwise).
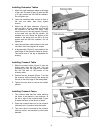
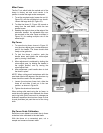
6. Make sure the set screws in the adaptor are
set flush on the blade side. (They should
protrude to the rear to engage the arbor for
positive drive). See Figure 16. Clean the
mating surfaces, install new blade, and
tighten arbor nut securely.
7. Remove locking pin (B, Figure 15) and close
blade cover.
SAFETY TIP: Tape a red rag on the locking pin
and drape it over the blade while pin is inserted.
This will remind you to remove the pin before
starting the saw!
Installing/Replacing Scoring Blade
1. Disconnect machine from power source.
2. Push sliding table all the way to the left and
open blade cover.
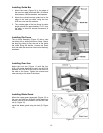
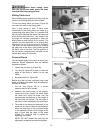
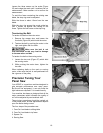
3. Tilt scoring blade all the way, and place
spanner (A, Figure 17) on the flat of the
arbor.
4. Loosen the bolt with the hex wrench (B,
Figure 17). (NOTE: Right hand threads-turn
counterclockwise to loosen).
5. Mount scoring blade and re-tighten bolt.
Close blade cover.
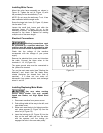
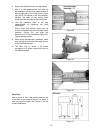
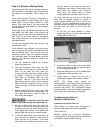
Riving Knife
The machine is equipped with a riving knife (A,
Figure 18) for use with saw blades up to 315mm
in diameter.
The purpose of the riving knife (or "splitter") is to
prevent the kerf from closing as it leaves the
cutting teeth, and thereby reduce the chance of
the kerf coming in contact with the up-running
teeth of the blade and causing binding or a
dangerous kickback. When the forward edge of
the workpiece reaches the riving knife, the knife
also helps guide the rest of the cut and will
prevent the up-running teeth from scoring the
workpiece.
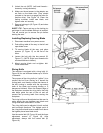
The riving knife must be adjusted so that over its
entire length the gap between saw blade and
riving knife does not exceed 3 to 8mm.
The riving knife can be adjusted in both vertical
and horizontal directions. The highest point of
the riving knife should never exceed 3mm above
the highest placed saw blade tooth.
Use the central bolt (B, Figure 18) and the three
adjustment screws (C, Figure 18). After
adjustment, always lock the central bolt (B,
Figure 18).
Figure 16
Figure 17
Figure 18