


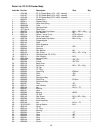

13
Disconnect stock feeder
from power source before opening the back
cover or switching gears.
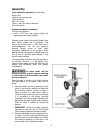
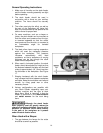
To change the position of the gears:
1. Disconnect machine from power source.
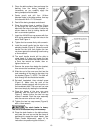
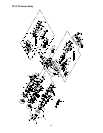
2. Unscrew the two knobs and pull off the back
cover to expose the gear system, shown in
Figure 13.
3. Remove hex nuts and flat washers (A,
Figure 13) with a 14mm wrench.
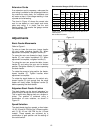
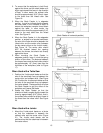
4. Figure 14 shows the relationship of gear
position to create each of the four speeds. A
similar chart is affixed to the inside of the
back cover on the Stock Feeder.
5. Install new gear configuration, making sure
the notch in each gear slides into the
keyway of the shaft. Push the gears as far
as they will go onto the shafts.
6. Install flat washer and hex nut (A, Figure 13)
on each shaft, and tighten.
7. Re-install back cover and tighten knobs.
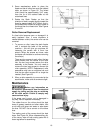
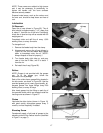
Operating Controls
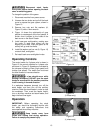
The control switch for 3-phase units is shown in
Figure 15; the control switches for 1-phase units
are shown in Figure 16. Speeds are indicated by
the universal symbols of hare (high speed) and
tortoise (low speed). The switch can be turned
for either forward or reverse direction.
If a jam should occur while
feeding a workpiece, DO NOT turn the stock
feeder to reverse while the auxiliary machine
is still running in forward direction.
If a workpiece becomes jammed, turn off the
stock feeder, and then turn off the auxiliary
machine. Raise the stock feeder in order to clear
the workpiece. Then re-set the feeder height,
turn on auxiliary machine and stock feeder, and
begin the feed over again.
Operation
IMPORTANT: Before operating the stock
feeder, you should be thoroughly familiar with
the safety and operating instructions that
accompanied the auxiliary machine.
Keep hands away from
rollers and cutting tool during operation.
Failure to comply may cause injury.
Figure 13
Figure 14
Figure 15
(3-Phase only)
Figure 16
(1-phase only)