


14
15
OPERATION
Fig. 10
Fig. 11
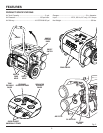
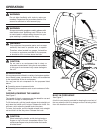
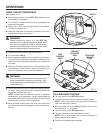
USING THE AIR COMPRESSOR
See Figures 10 - 11.
n Ensure power switch is in the OFF (O) position and air
compressor is unplugged.
n If not already installed, attach hose to compressor as
previously instructed.
n Attach 1/4 in. NPT male connector fitting to accessory
or tool you intend to use.
n Insert the other end of the male connector to the quick
coupler on the open end of hose.
WARNING:
Always ensure the switch is in the OFF (O)
position and the regulator pressure gauge reads
zero before changing air tools or disconnecting
the hose from the air outlet. Failure to do so could
result in possible serious personal injury.
n Connect the power cord to the power supply.
n Turn the switch ON ( l ).
n Rotate pressure regulator knob to desired line pressure.
Turning the knob clockwise increases air pressure at the
outlet; turning counterclockwise reduces air pressure at
the outlet.
n Following all safety precautions in this manual and the
manufacturer’s instructions in the air tool manual, you
may now proceed to use your air-powered tool.
WARNING:
Your tool may require more air consumption than
this air compressor is capable of providing. Check
the tool manual to avoid damage to the tool or risk
of personal injury.
n Control the amount of air flow with the pressure regula-
tor knob. Turning the knob fully counterclockwise will
completely stop the flow of air.
NOTE: Always use the minimum amount of pressure
necessary for your application. Using a higher pressure
than needed will drain air from the tank more rapidly and
cause the unit to cycle on more frequently.
n When finished, always drain the tank and unplug the
unit. Never leave the unit plugged in and/or running unat-
tended.
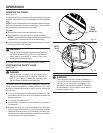
COLD WEATHER STARTING
n Turn the switch to the OFF (O) position.
n Turn the tank drain valves counterclockwise to open.
NOTE: The air compressor has two tanks. Be sure to
open both tank drain valves.
n Pull the switch out to the ON ( l ) position and run the
compressor for 1 - 2 minutes.
n Turn the switch to the OFF (O) position.
n Turn the tank drain valves clockwise to close.
NOTE: The air compressor has two tanks. Be sure to
close both tank drain valves.
n Follow normal operating procedures.
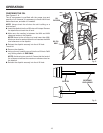
PRESSURE
REGULATOR
KNOB
TANK
PRESSURE
GAUGE
REGULATOR
PRESSURE
GAUGE
SWITCH