


Ridge Tool Company
9
4. Rotate cam plate to original position and replace
stop screw.
NOTE! If it becomes necessary to remove or replace the
guide block, the stamped number E-1997 on
guide block must be AGAINST selector plate. If
stamped number is visible you will cut an
UNDERSIZED thread.
Threading With Geared Threaders
WARNING
When threading pipe up to 5″ nominal, the 450
Tristand Vise can be used. However, when thread-
ing 6″ nominal pipe, a BC-610 or BC-810 Top Screw
Bench Chain Vise or a 460 Tristand Vise must be
used.
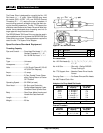
1. Position pipe to be threaded securely in vise.
To prevent tipping, long lengths of pipe
should also be supported with a pipe stand. Vise and
stands should be on level ground.
2. Install the No. 774 Square Drive Adapter in the Power
Drive, spline end first, until the spring-loaded adapter
pawls catch securely.
NOTE! Installation can be made from either side of the
Power Drive.
3. Adjust Geared Threader for size of pipe to be thread-
ed (Refer to previous instructions). Using two persons,
pick up threader and slide it onto the pipe. Carefully
center the end of the pipe in the throats of the dies.
4. Tighten Workholder and Clamp Screw securely with
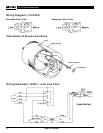
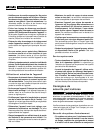
the socket wrench (Figure 9).
5. If necessary, fill the 418 Oiler with thread cutting oil.
Position the Oiler under the Geared Threader.
6. Slip the No. 774 Square Drive Adapter (installed in
Power Drive) onto the Drive Pinion of the Geared
Threader and tighten the two set screws in the
Adapter.
7. Hold Power Drive handle with one hand and leave
other hand free to apply thread cutting oil. Actuate
switch button in direction required for threading
(Figure 9).
To avoid injury, hold onto the Power Drive
handle firmly to resist handle force developed during
threading.
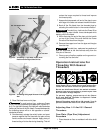
Figure 9 – Threading With Geared Threader
8. Apply plenty of thread cutting oil to the dies during
threading to reduce the torque required to thread
and improve thread quality.
9. When die head begins to press on ring at base of pin-
ion sleeve and red stop line appears, the threading is
completed. Release switch button to stop Power
Drive.
NOTE! RIDGID Geared Threaders have a jam-proof
design so pinion shaft will automatically disen-
gage if threader is accidentally run on pipe past
a full thread length.
10. Back off die head by actuating switch button in the
reverse direction. Keep switch actuated until dies
are free from end of pipe.
To avoid injury, hold onto the Power Drive
handle firmly to resist handle forces developed while
backing off the die head.
11. Loosen set screws in adapter and remove Power
Drive from the Drive Pinion.
12. Loosen Clamp Screw and Workholder with socket
wrench. Using two persons, remove the Geared
Threader from the pipe.
13. Remove the pipe from the vise.
To avoid injury, make sure long sections
of pipe are supported at the end farthest away from the
vise prior to removal.
14. Clean any oil spills or splatter on the ground sur-
rounding the vise and oiler.
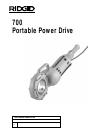
No. 700 Portable Power Drive
WARNING
WARNING
Geared Threader
Clamp Screw
No. 418 Oiler
Workholder
Drive Pinion
WARNING
WARNING