


20
21
OPERATION
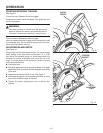
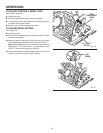
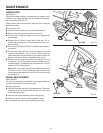
TO BEVEL CUT
See Figure 18.
WARNING:
Attempting a bevel cut without having the bevel
adjustment lever securely locked in place can result
in serious injury.
n Hold the saw firmly with both hands as shown.
n Rest the front edge of the base on the workpiece.
n Start the saw and let the blade reach full speed.
n Guide the saw into the workpiece and make the cut.
n Release the trigger and allow the blade to come to a
complete stop.
n Lift the saw from the workpiece.
The notch marked 0° in the base may be used as a guide
for making straight 90° cuts. For 45° bevel cuts, the notch
marked 45° may be used as a guide. See Figure 18.
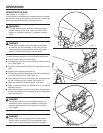
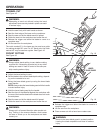
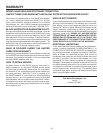
POCKET CUTTING
See Figure 19.
WARNING:
Always adjust bevel setting to zero before making
a pocket cut. Attempting a pocket cut at any other
setting can result in loss of control of the saw pos-
sibly causing serious injury.
n Adjust the bevel setting to zero.
n Set the blade to the correct blade depth setting, depend-
ing on the material to be cut.
n Swing the lower blade guard up using the lower blade
guard handle.
NOTE: Always raise the lower blade guard with the handle
to avoid serious injury.
n Hold the lower blade guard by the handle.
n Rest the front of the base flat against the workpiece with
the rear of the handle raised so the blade does not touch
the workpiece.
n Start the saw and let the blade reach full speed.
n Guide the saw into the workpiece and make the cut.
WARNING:
Always cut in a forward direction when pocket cut-
ting. Cutting in the reverse direction could cause
the saw to climb up on the workpiece and back
toward you.
Fig. 19
LOWER
BLADE GUARD
n Release the trigger and allow the blade to come to a
complete stop.
n Lift the saw from the workpiece.
n Clear corners out with a hand saw or sabre saw.
WARNING:
Never tie the lower blade guard in a raised position.
Leaving the blade exposed could lead to serious
injury.
Fig. 18
45°
NOTCH
90°
NOTCH