


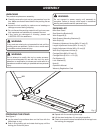
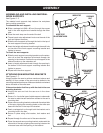

10 11
OPERATION
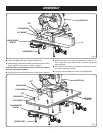
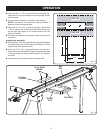
USING THE EXTENSION RAILS
See Figure 10.
Use the extension rails when working with larger
workpieces.
To extend the rails:
n Loosen the extension adjustment knob.
n Extend the rail to the desired position.
n Tighten the extension adjustment knob.
Fig. 10
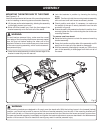
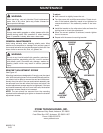
USING THE WORK STOPS
See Figure 11.
Raise the work stops whenever you need to make repetitive
cuts of the same size. To avoid a greater risk of binding or
pinching, do not use both work stops at the same time.
To raise the work stops:
n Loosen the work stop adjustment knob.
n Raise the work stop to the desired position.
n Tighten the work stop adjustment knob.
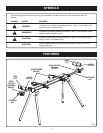
EXTENSION
ADJUSTMENT
KNOB
EXTENSION
RAIL
WORK STOP
WORK STOP
ADJUSTMENT
KNOB
Fig. 11
BUILDING AND INSTALLING AN OPTIONAL
WORKSHELF
See Figures 12 - 14.
Use the following directions, if desired, to build a workshelf
for the miter stand.
Materials needed:
n 9 x 20 in. plywood, 3/4 in. thick
n 8 wood screws, 1-1/4 in. length
n Drill and bit to drill and countersink screw holes
Building the workshelf:
n Make cuts as shown in the cutting diagram below.
Fig. 12
n Cut the ends of the three 3/4 in. pieces so that two are
6 in. long and one is 7-1/2 in. long.
n Align the two 3/4 x 6 in. plywood strips vertically along
the left and right sides of the 9 x 13 in. base, making sure
the front edges are flush.
n Pre-drill and countersink holes for screws in each of the
strips as shown in figure 10; install screws.
NOTE: Locate the screws at least 2 in. away from the
bottom corners of the assembly.
13"
3 1/2"
3/4"
3/4"
3/4"
9"