


12
0
15
45
OPERATION
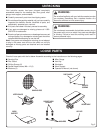
Fig. 14
TABLE
LOCK
KNOB
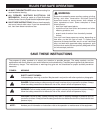
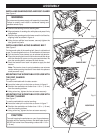
BEVEL SANDING
See Figure 14.
The worktable can be tilted from 0° to 45° for bevel sanding.
To tilt the worktable:
■ Loosen the table lock knob by turning it counterclockwise.
■ Set worktable to desired angle.
Note: Position the worktable not further than 1/16 in.
(1.6 mm) from the sanding surface.
■ Tighten the table lock knob by turning it clockwise.
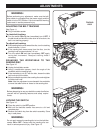
SANDING SMALL END SURFACES USING THE
MITER GAUGE
See Figure 15.
A miter gauge is included with your tool for increased
accuracy. Use of a miter gauge is recommended for sanding
small end surfaces on the sanding disc.
Note: Always move the workpiece across the sanding disc
from the left side towards the right side.
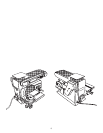
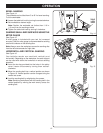
HORIZONTAL AND VERTICAL SANDING
See Figure 16.
Your belt/disc sander can sand both vertically and
horizontally. Depending on the workpiece, the work support
can be used with either the horizontal or vertical sanding
operation.
■ Insert the hex key provided into the holes in the pulley
cover. Loosen the screws by turning them counter-
clockwise.
■ Move the sanding belt into a vertical position as shown
in Figure 16. Vertical position can be changed using the
vertical set screw.
■ Lock the sanding belt by retightening the screws.
Note: Sand long workpieces with the sanding belt in the
vertical position by moving the work evenly across the
sanding belt.
Fig. 15
4
x
36
4 x36