


Page 24
MAINTENANCE
WARNING:
When servicing, use only identical Ryobi replacement
parts. Use of any other parts may create a hazard or
cause product damage.
WARNING:
Always wear safety goggles or safety glasses with side
shields during power tool operation or when blowing dust.
If operation is dusty, also wear a dust mask.
GENERAL MAINTENANCE
Avoid using solvents when cleaning plastic parts. Most
plastics are susceptible to damage from various types of
commercial solvents and may be damaged by their use. Use
clean cloths to remove dirt, dust, oil, grease, etc.
WARNING:
Do not at any time let brake fluids, gasoline, petroleum-
based products, penetrating oils, etc., come in contact
with plastic parts. Chemicals can damage, weaken or
destroy plastic which may result in serious personal
injury.
n Keep your band saw clean.
n Remove sawdust from the inside frequently.
n Do not allow pitch to accumulate on the saw table, blade
guides, or thrust bearings. Clean them with gum and pitch
remover.
n Apply a thin coat of automobile type wax to the saw
table’s top so the wood slides easily while cutting.
LUBRICATION
All of the bearings in this tool are lubricated with a sufficient
amount of high grade lubricant for the life of the unit under
normal operating conditions. Therefore, no further lubrica-
tion is required.
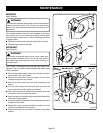
MOTOR/ELECTRICAL
n Frequently vacuum or blow out sawdust from the
motor.
WARNING:
If the power cord is worn, cut or damaged in any way,
have it replaced immediately by a qualified service tech-
nician. Failure to do so could result in serious personal
injury.
WARNING:
To avoid fire or electrocution, reassemble electric parts
with only identical replacement parts. Reassemble ex-
actly as originally assembled.
TIRES
Cleaning tires:
n Pitch and sawdust accumulates on tires and needs to be
removed with a fine wire brush or a piece of wood. Do
not use a sharp knife or any kind of solvent.
Replacing tires:
n Open front cover and remove saw blade. See section on
Installing and Adjusting the Blade, page 20.
n Pry the worn tire away from the wheel carefully.
n Stretch the new tire around the wheel.
n Replace the saw blade and close the front cover.