


16
ASSEMBLY
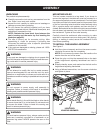
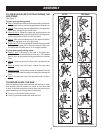
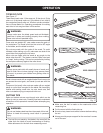
TO OPEN/CLOSE (SET-UP/TEAR DOWN) THE
LEG STAND
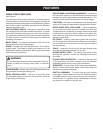
See Figure 7.
�To open (set-up) the leg stand:
� Step 1: With the saw table on end and standing to the side,
use your left hand to pull the leg stand latch towards you.
Step 2: Once the leg stand is released from the table saw
base, ease the legs of the stand down.
Steps 3 and 4: Grasp the upper leg support below the
saw cabinet. Keeping your left hand clear of the leg stand,
pull the leg stand up until it locks into place.
Step 5: With your left hand firmly on the table tilt handle,
grasp the leg stand with your right hand.
Steps 6 and 7: Push the leg stand towards the ground with
your right hand and pull in the same direction with your
left hand until the table saw is in an upright position.
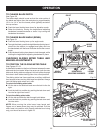
��To close (tear down) the leg stand:
Steps 1 and 2: Standing to the side of the table saw,
grasp the table tilt handle with your left hand. Tilt the table
saw to your left and grab the leg just below the leveling
foot.
Step 3: Lower the saw to the floor until it is balanced on
end.
Step 4: Using your left hand, release the leg stand
latch.
Steps 5 and 6: Once the leg stand is released from the
table saw base, ease the legs of the leg stand toward the
floor.
Step 7: Lift the lower leg of the leg stand until it locks in
place.
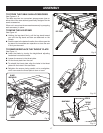
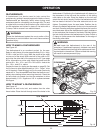
TO SECURE/LEVEL THE SAW
With the leg stand open and the table saw resting on a flat,
level surface, the saw should not move or rock from side
to side. If the saw rocks from side to side, the leveling foot
needs adjusting until the leg stand is balanced.
Turning clockwise will lower the foot.
Turning counterclockwise will raise the foot.
Fig. 7
SET-UP
TEAR DOWN