


10
ADJUSTMENTS
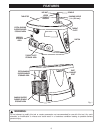
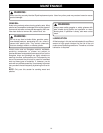
REMOVING SANDING SLEEVES
See Figure 3.
Follow these directions to remove sanding sleeves.
■ Unplug the sander.
WARNING:
Failure to unplug the tool could result in accidental
starting causing serious injury.
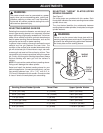
■ Grasp and hold the sanding sleeve on the spindle.
■ Loosen the hex nut using the wrench provided.
NOTE: If the hex nut is too tight and the spindle shaft
spins inside the sanding sleeve, grasp the flats on
top of the spindle shaft with a 1/4 in. wrench (not
provided) and loosen the hex nut.
■ Remove the hex nut, upper spindle washer, sanding
sleeve, rubber spindle, and throat plate.
NOTE: It is recommended that you clean dust
accumulations from the throat plate, throat plate nest,
and under the lower spindle washer after each use.
Remove the lower spindle washer and clean dust
accumulations.
INSTALLING SANDING SLEEVES
(All except 1/2 in. (12.7 mm))
See Figure 4.
Follow these directions to install sanding sleeves.
■ Unplug the sander.
WARNING:
Failure to unplug the tool could result in accidental
starting causing serious injury.
■ Place the lower spindle washer over the spindle, fin
side down.
NOTE: Always install the fin side of the washer
down. The fins help push dust through the dust
exhaust port opening, preventing buildup of dust.
Dust in this area may cause the oscillating motion to
stop. Always use the lower spindle washer with all
sanding sleeves.
■ Select and install the correct throat plate. Refer to
SELECTING THROAT PLATES/UPPER SPINDLE
WASHERS earlier in this manual.
■ Select and install the correct rubber spindle.
■ Install the appropriate sanding sleeve on the rubber
spindle.
NOTE: If the sanding sleeve becomes difficult to
remove or install, apply talcum powder on the rubber
spindle or inside the sanding sleeve before installing
the sanding sleeve on the rubber spindle.
■ Install the upper spindle washer and hex nut.
NOTE: Use the 7/8 in. (22.2 mm) washer for the 3/4
in. (19.1 mm), 1 in. (25.4 mm), and 1-1/2 in.
(38.1 mm) rubber spindles. Use the 1-13/16 in.
(46 mm) washer for the 2 in. (50.8 mm) and 3 in.
(76.2 mm) rubber spindles.
■ Grasp and hold the sanding sleeve on the spindle.
■ Tighten the hex nut using the wrench provided.
NOTE: Tighten the hex nut only enough to expand
the rubber spindle against the inner wall of the
sanding sleeve. Do not overtighten.
■ Return the wrench to the storage area.
Fig. 3
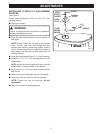
Fig. 4
SANDING
SLEEVE
THROAT
PLATE
WRENCH
TO LOOSEN
TO TIGHTEN
HEX NUT
UPPER
SPINDLE
WASHER
RUBBER
SPINDLE
THROAT
PLATE
SANDING
SLEEVE
WRENCH
LOWER
SPINDLE
WASHER
SPINDLE