


7
Before using the oscillating spindle sander, familiarize
yourself with all operating features and safety
requirements. However, do not let familiarity with the tool
make you careless.
WARNING:
Exercise caution when using the oscillating spindle
sander. Careless actions, for even a fraction of a
second, can result in serious personal injury.
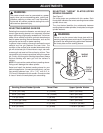
SWITCH
The ON/OFF switch has a built-in locking feature that
requires you to insert a key before turning on the sander.
Pushing the switch to the OFF position and removing the
key secures the sander against unintentional use. This
feature is intended to prevent unauthorized and possible
hazardous use by children and others.
WARNING:
Always lock the switch OFF when the sander is not
in use. Remove the key and keep it in a safe place.
In the event of a power failure, turn the switch OFF
and remove the key. This action will prevent the
sander from accidentally starting when power re-
turns.
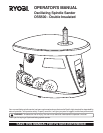
MOTOR
The sander has a 3.5 amp motor with sufficient power to
handle tough sanding jobs. It develops a no load speed
of 2,000 RPM and 58 OPM.
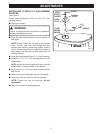
OSCILLATING MOTION
As the name implies, the most unique feature of this
sander is the fact that it oscillates. This means that the
spindle rises and falls as it rotates. The oscillating range
for the sander is 5/8 in. (15.9 mm).
SANDING CAPACITIES
The sander accepts sanding sleeves that are 1/2 in.
(12.7 mm) through 3 in. (76.2 mm) in diameter and
4-1/2 in. (114.3 mm) in height.
NOTE: Sanding sleeves are 4-1/2 in. (114.3 mm) tall;
however, you can only sand material up to 3-11/16 in.
(93.7 mm) thick.
The 1/2 in. (12.7 mm) sanding sleeve fits directly on the
1/2 in. (12.7 mm) spindle and requires no rubber spindle.
It is secured in place with a washer and hex nut on top
of the spindle. All other sanding sleeves require a rubber
spindle to secure them in place. These rubber spindles
fit on the spindle and require a throat plate and sanding
sleeve. A washer and hex nut thread on top of the spindle
to hold everything in place.
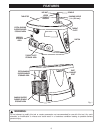
FEATURES
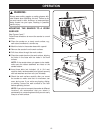
TABLE SIZE
The sanding table provides ample sanding space for
most workpieces. The table top is 19-1/4 in. (489 mm)
long x 15-3/4 in. (400 mm) wide.
THROAT PLATES
Six throat plates are included with the sander. The throat
plate provides a stable surface around the sanding
sleeve and prevents objects from falling through the
throat and damaging the spindle.
DUST COLLECTION
A standard 2-1/4 in. (57.2 mm) dust exhaust port is
provided to help keep dust to a minimum. It is located
under the table top on the back of the sander. The end
of a standard shop vacuum hose fits tightly inside the
dust exhaust port.
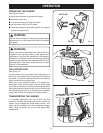
THROAT PLATE/WRENCH STORAGE AREA
A throat plate and wrench storage area is located on the
left side of the cabinet.
SANDING SLEEVE/RUBBER SPINDLE
STORAGE AREA
A sanding sleeve and rubber spindle storage area is
located on the right side of the cabinet. Store unused
sanding sleeves and rubber spindles on their designated
pins. Proper storage of sanding sleeves and rubber
spindles helps protect them from being damaged and
getting lost.
EXTRA SANDING SLEEVE/WASHER
STORAGE AREA
Store extra sanding sleeves and upper spindle washers
under the table in either of the cavities.