


13
OPERATION
SAW BLADES
The best of saw blades will not cut efficiently if they are not
kept clean, sharp, and properly set. Using a dull blade will
place a heavy load on the saw and increase the danger of
kickback. Keep extra blades on hand, so that sharp blades
are always available.
Gum and wood pitch hardened on blades will slow the saw
down. Remove saw blade from the saw and use gum and
pitch remover, hot water, or kerosene to remove these ac-
cumulations. DO NOT USE GASOLINE.
BLADE GUARD SYSTEM
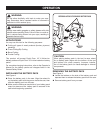
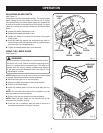
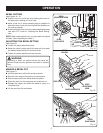
See Figure 9.
The lower blade guard attached to your circular saw is there
for your protection and safety. Do not alter it for any reason.
If it becomes damaged, do not operate the saw until you
have the guard repaired or replaced. Always leave guard in
operating position when using the saw.
DANGER:
When sawing through work, lower blade guard does not
cover blade on the underside of work. Since blade is
exposed on underside of work, keep hands and fingers
away from cutting area. Any part of your body coming in
contact with moving blade will result in serious injury.
CAUTION:
Never use saw when guard is not operating correctly.
Check the guard for correct operation before each use.
The guard is operating correctly when it moves freely and
readily returns to the closed position. If you drop the saw,
check the lower blade guard and bumper for damage at
all depth settings before reuse.
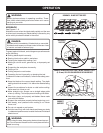
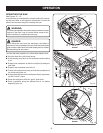
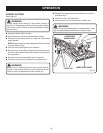
STARTING/STOPPING THE SAW
See Figure 10.
To start the saw: Depress the switch trigger.
Always let the blade reach full speed, then guide the saw
into the workpiece.
WARNING:
The blade coming in contact with the workpiece before
it reaches full speed could cause the saw to “kickback”
towards you resulting in serious injury.
To stop the saw: Release the switch trigger.
After you release the switch trigger, allow the blade to
come to a complete stop. Do not remove the saw from
the workpiece while the blade is moving.
Fig. 9
BLADE EXPOSED ON
UNDERSIDE OF WORKPIECE
LOWER BLADE GUARD
IS IN UP POSITION
WHEN MAKING A CUT
Fig. 10
SWITCH
LOCK-OFF
BUTTON
LOCK-OFF BUTTON
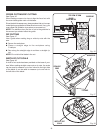
See Figure 10.
The lock-off button reduces the possibility of accidental
starting. The lock-off button is located on the handle above
the switch trigger. The lock-off button must be depressed
before you pull the switch trigger. The lock resets each time
the trigger is released.
NOTE: You can depress the lock-off button from either the
left or right side.