


6
PREPARING YOUR BATTERY TO BE CHARGED
It is important that you read and follow these guidelines while you are preparing to
charge the battery.
• Make sure that you have a 6 volt or 12
volt lead-acid battery. Determine volt-
age of battery by referring to vehicle
owner’s manual. Charge battery initially
at charger’s lowest rate.
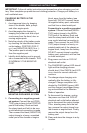
• Clean the battery terminals. Be careful to
keep corrosion from getting in or around
your eyes.
• Wear safety glasses. See additional
“Personal Safety Precautions” on
page 4.
• For batteries with removable vent caps, if
required, add distilled water to each cell
until the battery acid reaches the level
recommended by the manufacturer. This
will help purge excessive gases from the
cells. Be careful not to overll. If you have
a sealed battery with non-removable
vent caps, no action is necessary.
• Take time to read all of the battery
manufacturer’s specic precautions,
such as removing or not removing vent
caps while charging, and recommended
rates of charge.
• Be sure that the area around the battery
is well ventilated while it is being charged.
Gases emitted from the battery can be
forcefully blown away by using a piece of
cardboard or other nonmetallic material
as a fan.
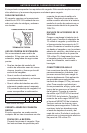
• If it is necessary to remove the battery
from the vehicle to charge it, always
remove the grounded terminal from the
battery rst. Turn off all vehicle acces-
sories to avoid sparks from occurring.
DANGER - Never alter the AC plug pro-
vided. If it will not t the outlet, have a proper
outlet installed by a qualied electrician.
Improper connection can result in the risk
of electrical shock.
WARNING - Connect and disconnect
the battery clamps only when the AC
power cord is disconnected or arcing
may result.
• NOTE: A marine (boat) battery installed
in a boat must be removed and charged
on shore.
USING YOUR BATTERY CHARGER
The 200A does not have an ON/OFF switch. The On and Off commands are con-
trolled by plugging the 200A into a 120V AC electrical wall outlet only after battery
connections have been made.
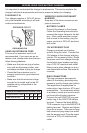
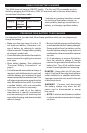
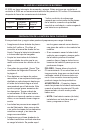
LED Indicators
Charging Charged/
Maintain
Check Battery*
Amber Green Red
*Indicates an overload condition caused
by shorting of the battery clamps, re-
verse polarity (hookup) connection to a
battery, or charging a problem battery.