


3
1. Position AC power cord and DC charging cords to reduce
risk of damage by hood, door, or moving engine parts.
2. Stay clear of fan blades, belts, pulleys, and other parts
that can cause injury.
3. Check polarity of battery posts. Battery case will be
marked by each post: POSITIVE (POS, P, +) and NEGA-
TIVE (NEG, N, -). NOTE: The positive battery post usually
has a larger diameter than the negative post.
4. Determine which post of battery is ground (connected) to
chassis.
NOTE: The negative post is normally grounded.
OPERATING INSTRUCTIONS: CHARGING BATTERY IN VEHICLE
When charging battery in the vehicle, take care to determine the battery type and which post is grounded. To reduce risk of a spark
near battery, follow these steps when battery is installed in vehicle. WARNING: A spark near battery may cause battery explosion.
WARNING: Do not connect clip to carburetor, fuel lines, or sheet-
metal body parts. NOTE: Attach clips to battery post and twist or
rock back and forth several times to make a good connection.
This tends to keep clips from slipping off terminals and helps to
reduce risk of sparking.
6. Select amperage:
7. Follow steps 1-4 in Battery Charger Section K.
8. When battery is fully charged, unplug charger from AC power
source.
9. Remove charger clips from (1) chassis and (2) battery pole,
in that order.
10. Clean and store battery charger.
F.
OPERATING INSTRUCTIONS: CHARGING BATTERY OUT OF VEHICLE
When charging battery out of vehicle, take care to determine the battery type. To reduce risk of a spark near battery, follow these steps
when battery is outside vehicle. WARNING: A spark near the battery may cause battery explosion. WARNING: When removing battery from
vehicle or boat, disconnect grounded pole first. When disconnecting, make sure all accessories are off, so as not to cause an arc.
(NOTE: A marine (boat) battery must be removed and charged on shore. (To charge on board requires special equipment designed for
marine use.) WARNING: When reinstalling battery, attach the ground post first.
NEGATIVE GROUNDED POST
5A. For negative-grounded vehicle, connect POSITIVE (RED)
clip from battery charger to POSITIVE (POS, P, +) ungrounded
post of battery. Connect NEGATIVE (BLACK) clip to vehicle chas-
sis or engine block away from battery. Connect to a heavy gauge
metal part of the frame or engine block.
POSITIVE GROUNDED POST
5B. For positive-grounded vehicle, connect NEGATIVE
(BLACK) clip from battery charger to NEGATIVE (NEG, N, -) un-
grounded post of battery. Connect POSITIVE (RED) clip to ve-
hicle chassis or engine block away from battery. Connect to a
heavy gauge metal part of the frame or engine block.
G.
(1) Remove clip from end of Negative end of cable, then
(2) Remove clip from Positive battery post, in that order.
9. Clean and store battery charger.
WARNING: Be sure area around battery is well ventilated
while battery is being charged. Gas can be forcefully blown
away by using a piece of cardboard or other non-metallic
material as a fan.
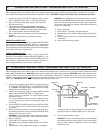
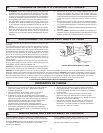
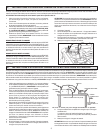
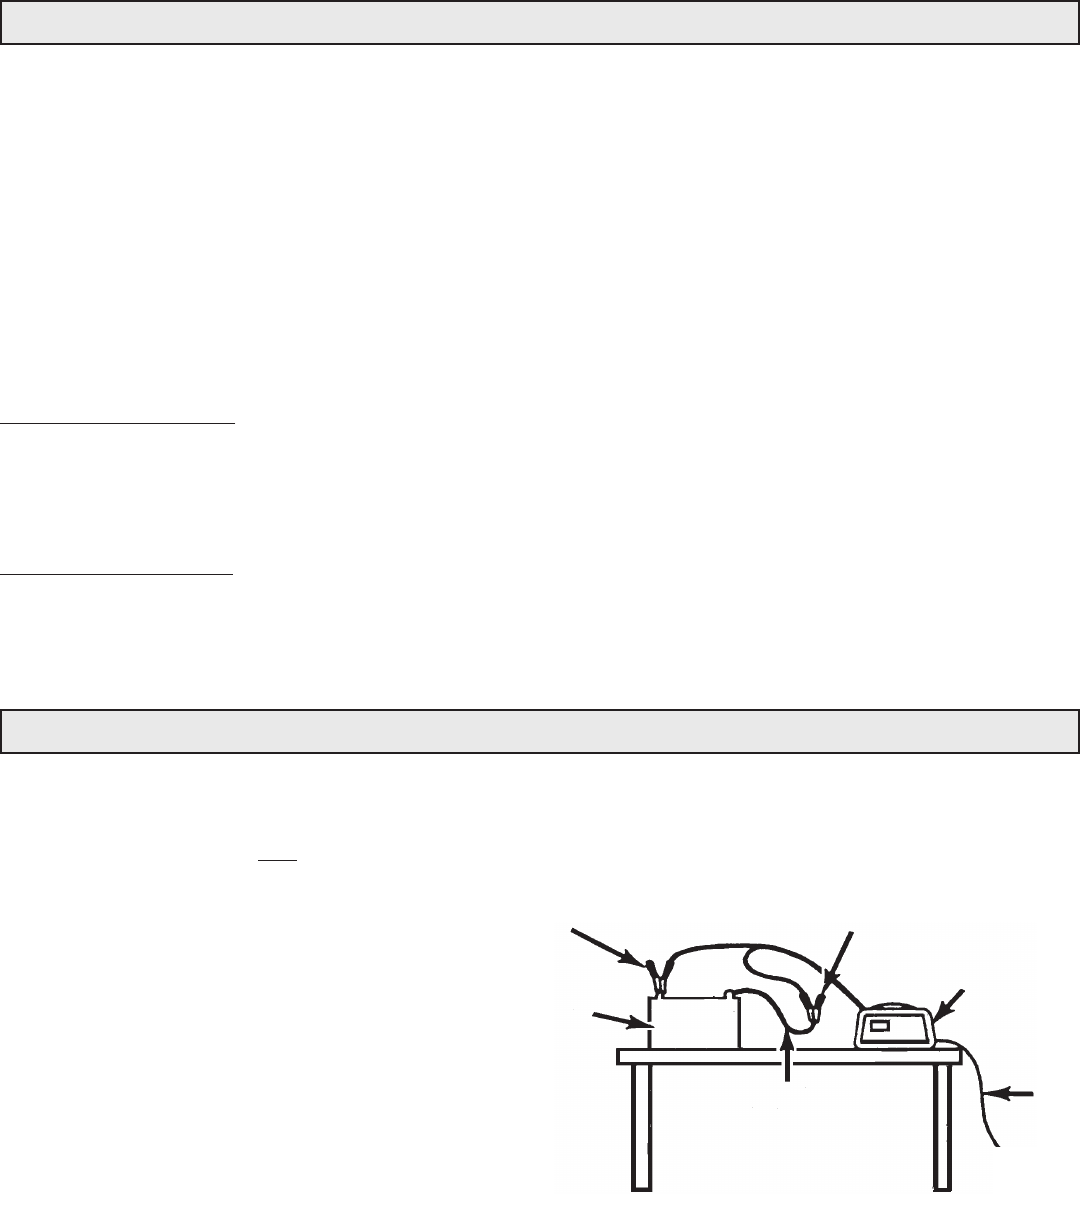
24" of 6 Gauge Cable
BATTERY CHARGER
NEGATIVE
POWER
CORD
TO GROUNDED
POWER OUTLET
+-
POSITIVE
BATTERY
1. Check polarity of battery posts. Battery case will be marked
by each post: POSITIVE (POS, P, +) and NEGATIVE (NEG,
N, -). NOTE: The positive battery post usually has a larger
diameter than the negative post.
2. Attach a 24-inch long (or longer) 6-gauge (AWG) insulated
battery cable to NEGATIVE (NEG, N, -) battery post.
(The 24" lead is not supplied. You may purchase at most
automotive stores.)
The 24" lead provides a safer connection condition. Spark-
ing or arcing could occur when connecting the charger clip
to the lead.
3. Connect POSITIVE (RED) charger clip to POSITIVE (POS,
P, +) post battery. Rock clip back and forth to make good
connection.
4. Position yourself and free end of 24 inch cable as far away
from battery as possible. Then connect NEGATIVE (BLACK)
charger clip to free end of cable.
WARNING: Do not face battery when making final connec-
tion. Rock clip back and forth to make a good connection.
5. Select amperage:
6. Follow steps 1-4 in Battery Charger Section
7. When battery is fully charged, unplug charger from AC power
source.
8. When battery is fully charged and charger is unplugged,