


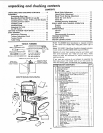
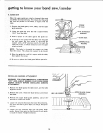

assembly
TO AVOID BEING SCRAPED SHOULD BLADE
SUDDENLY UNCOIL WEAR SAFETY GOGGLES AND
CAREFULLY UNCOIL THE BLADE HOLDING iT AT
ARMS LENGTH.
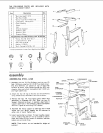
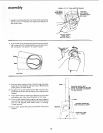
7. Carefully uncoil the blade, holding it at arms length.
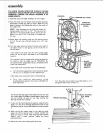
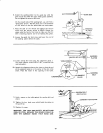
8. Place the blade over the wheels with the teeth pointing
downwards toward the table as shown. Make sure the
blade is between the blade guides and is in the center of
the rubber tl res.
NOTE: Your bandsaw can be used with blades of
various widths from 1/8" to 1/2". The saw must be
adjusted to the proper blade tension setting for the
blade to be used. A 1/4" wide blade is included with
this saw.
9. Screw down the tension knob until the pointer points
to 1/4. This will pu_ sufficient tension on a 1/4" wide
blade.
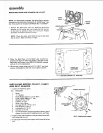
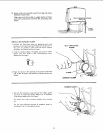
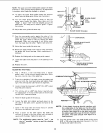
10. Turr the upper wheel by hand a few times and notice if
the blade remains in the approx, center of the tire on
the top wheel.
If the blade moves away from the center of the wheel
while you are turning it, the blade is not TRACKING
properw.
The top wheel shaft is hinged which allows the wheel to
be tilted so that the blade can be TRACKED, By
turning the tracking adjustment screw, the wheel will De
tilted. (see illustration).
If the blade moves toward the front of the band saw:
a. Turn the tracking adjustment screw clockwise about
1/4 of a turn, as though you were tightening it.
If the blade moves toward the back of the band saw:
a. Turn the tracking adjustment screw
counterclockwise about 1/4 of a turn as though you
were loosening it.
POINTER
_--TENSION ADJ. KNOB
]
T
SCREW
BLADE
CENTERED
ON TIRES
OF BOTH
WHEELS
Turn the screw just enough to cause the blade to run in
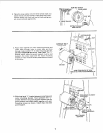
the appro×=mate center of the tire.
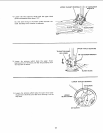
The thrust bearings support the blade from the rear and
will rotate when the blade is pushed against them while
you are cutting. As soon as you stop cutting, the
bearings should stop rotating,
11
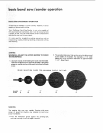
To be sure the thrust bearing is properly supporting the
blade, turn the thrust bearing adjustment knob so that
the bearing moves toward the blade and almost touches
it.
12. While turning the upper wheel to the right by hand,
adjust the thrust bearing until it barely touches the
blade and starts to rotate. Now move the bearing back
slightly, until it stops rotating. Tighten the thrust
bearing setscrew.
13. Adjust the lower thrust bearing the same way.
THRUST BEARING
/
THRUST BEARING
ADJ. KNOB
14