


• 9 •
Powering a 120V AC Device8.11
To operate a 120V AC device:
Ensure that the battery clips are securely on the storage holders.1.
Open the protective cover of the AC power outlet on the front panel of the jump starter.2.
Make sure the 120V AC device to be operated is turned OFF.3.
Plug the 120V AC device into the AC power outlet, and turn the Inverter/Compressor 4.
Switch to the INVERTER position.
Turn the device on.5.
If the device does not operate properly when rst connected to the inverter, push the 6.
inverter rocker switch ON, OFF, and ON again in quick succession. If this procedure
is not successful, it is likely that the inverter does not have the required capacity to
operate the device intended.
Charge the jump starter as soon as possible after each use.7.
Risk of electric shock.
Incorrect operation of your inverter may result in damage and personal injury.
The inverter output is 120V AC and can shock or electrocute the same as any
ordinary household AC wall outlet.
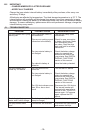
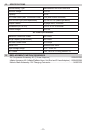
120V AC Electrical Device Example Run-Time Chart
Appliance Type Estimated Power Estimated Time*
Spotlights, Sump Pumps, DVD Players 100 Watts 1.5 Hours
Faxes, TVs, Small Power Tools 150 Watts 1.25 Hours
Computer Printer, Medium Power
Tools, Blenders
200 Watts 55 Minutes
NOTE: These are estimated run-times, actual time may vary. Times are based on the
internal battery being new, fully charged and operated at room temperature.
NOTE: The maximum continuous load is 400 watts. Do not use the inverter with a
product that draws more than 400 watts, as this may cause damage to the inverter
and the product.
MAINTENANCE INSTRUCTIONS9.
After use and before performing maintenance, unplug and disconnect the jump starter 9.1
(see sections 3 and 4).
Use a dry cloth to wipe all battery corrosion and other dirt or oil from the battery clips, 9.2
cords and the jump starter case.
Ensure that all of the jump starter components are in place and in good working 9.3
condition, for example, the plastic boots on the battery clips.
Servicing does not require opening the unit, as there are no user-serviceable parts.9.4
All other servicing should be performed by qualied service personal.9.5
MOVING AND STORAGE INSTRUCTIONS10.
Store the jump starter in an upright position. 10.1
Store inside, in a cool, dry place.10.2
Do not store the clips on the handle, clipped together, on or around metal, or clipped to 10.3
cables. The clips on the jump starter are live and will produce arcing or sparking if they
come in contact with each other. To prevent accidental arcing, always keep the clips on
the storage holders when not using them to jump start a vehicle.
If the jump starter is moved around the shop or transported to another location, take 10.4
care to avoid/prevent damage to the cords, clips and jump starter. Failure to do so could
result in personal injury or property damage.
Do not use and/or store the jump starter in or on any area or surface
where damage could occur if the internal battery should unexpectedly leak acid.