


Your router has been shipped completely assembled and
ready for use. Inspect it carefully to make sure no breakage
or damage has occurred during shipping. If any parts are
damaged or missing, contact your nearest Sears Retail
Store to obtain replacement parts before attempting to
operate router. A wrench and this owner's manual are also
included.
WARNING:
If any parts are missing, do not operate your router until
the missing parts are replaced. Failure to do so could
result in possible serious personal injury.
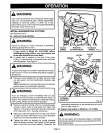
SWITCH
To turn your router ON, depress the switch trigger, Release
switch trigger to turn your router OFF,
LOCK-ON BUTTON
The switch of your router is equipped with a lock-on feature
which is convenient when operating for extended periods of
time. To lock on, depress the trigger, push in the lock button
located on the side of the handle_then while holding the lock
button pushed in, release tke trigger. To release the lock,
depress the trigger and release it.
,WARNING:
Before connecting your router to power supply source,
always check to be sure it is not in lock-on position
(depress and release switch trigger). Failure to do so
could result in accidental starting of your router resulting
in possible serious injury. Also, do not lock the trigger on
jobs where your router may need to be stopped suddenly.
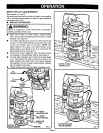
CHIP SHIELD
A clear plastic chip shield is installed on the front of your
router for protection against flying dust and chips. The shield
is designed tofit the opening ofthe router base. Ifnecessary
to remove chipshield, squeeze thetabs on each end and pull
outward. To replace, squeeze the tabs at each end, fit into
opening, then release. NOTE: Model No. 315.175060 has a
chip shield on the front and rear opening of the router base.
For your protection, do not use router without chip
shield(s) properly in place. Ifdesired, the horsepower label
can be removed from chip shield by simply peeling off.
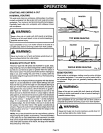
WRENCH STORAGE AREA
Your router has a wrench storage area located onthe top end
cap portionofthe motor housing.When installing or removing
cutters, remove the wrench from its storage area. Proper
storage of wrench when not in use will help reduce the
possibility of losing wrench.
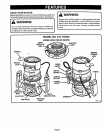
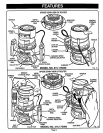
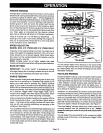
VARIABLE SPEED SWITCH WITH ELECTRONIC
SPEED CONTROL
(MODEL NOS. 315.175050 AND 315.175060 ONLY)
See Figures lb and lc.
Your router has advanced electronic features, designed to
assist you in getting the maximum use from your router. By
making proper speed selections, your router can be adjusted
to specific routing needs. This eliminates much of the guess
work previously needed to perform a given job. Both the
experienced and inexperienced router users benefit,
obtaining professional like results with fewer job errors.
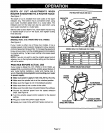
The variable speed control allows the router speed to be
adjusted from 15,000 to 25,000 rpm. The variable speed
control selector is conveniently located outside the right
handle near the operator's thumb or hand.
Speed can be set according to the approximate cutter
diameter you wilt be using and to the hardness of the
material being cut. The best cuts are made when the cutter
is fed through material at the proper rate of feed.
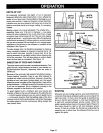
DUST BAG ASSEMBLY
(MODEL NO. 315.175060 ONLY)
See Figure lc.
The dust bag located on the side of your router provides a
dust collection system for your router. For more efficient
operation, empty dust bag when half full.
Do not connect router to power supply before installing dust
bag or connecting it to a dust collection system.
WARNING:
To prevent the possibility of sb.wdustor foreign objects
being thrown into your face and eyes, never attempt to
use your router without dust bag properly installed.
Sawdust or foreign objects being thrown into your face or
eyes could result in possible serious injury.
TO INSTALL DUST BAG:
The dust bag should be installed by slipping it with a twisting
motion over the blower exhaust. The bag should be installed
with the zipper down when router is in upright position.
TO EMPTY DUST BAG:
Remove dust bag from router, open zipper and shake out
dust.Occasionally turnthe dust bag inside outand brushthe
accumulation of dust from the inside of the bag. This will
allow the air to flow through the bag better.
Page 7