


-16-
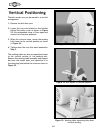
Working Table
The working table has two mounting locations:
next to the sanding disc and next to the verti-
cally positioned belt sander. We recommend ini-
tially mounting the working table next to the
disc. If you want to mount it next to the verti-
cally positioned belt sander, skip to the
“Vertical Positioning” instructions in the
Adjustment section.
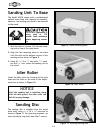
To install the working table next to the disc:
1. Loosen the (2)
5
⁄16"-18 x
3
⁄8" setscrews locat-
ed in the base, directly beneath the pulley
cover.
2. Insert the support bar into the hole in the
base that is adjacent to the setscrew holes.
Make sure that the flat side of the support
bar is facing the setscrews.
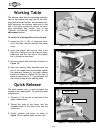
3. Securely tighten the setscrews as shown in
Figure 15.
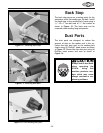
4. Slide the working table assembly onto the
end of the support bar and securely tighten
the setscrews located in the table support
bracket as shown in Figure 16. Be sure to
leave no more than a
1
⁄16" gap between the
disc and the edge of the working table.
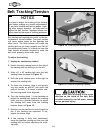
Quick Release
The quick release lever is used to loosen the
tension on the sanding belt. To install the quick
release lever:
1. Thread a
3
⁄8"-16 hex nut on each end of the
quick release levers.
2. Thread the ends of the levers into the
threaded holes in the short lever and the
rocker arm.
3. Finally, position the levers as shown in
Figure 17 and tighten down the hex nuts.
Figure 15. Tightening the setscrews.
Figure 16. Tightening the setscrews.
Figure 17. Installing the quick release.
Rocker Arm
Short Lever