11
While the main components of the Shop Fox
®
W1672 14" Bandsaw are assembled at the facto-
ry, some assembly is required. The following is
the recommended sequence best suited for final
assembly.
Stand
Hardware
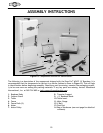
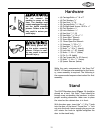
Figure 11. Bandsaw stand.
Do not connect the
machine to power at this
time. The machine must
remain unplugged through-
out the entire assembly
process. Failure to do this
may result in serious per-
sonal injury.
The W1672 Bandsaw stand (Figure 11) should be
placed on a hard, flat floor. There should be
enough area surrounding the bandsaw to allow
proper working clearances. Make sure to place
the stand so the cabinet door is in front.
With the door open, insert the
5
⁄16"-18 x 1" knob
into the door of the stand. Thread the
5
⁄16" lock
nut onto the knob. Leave enough play so you can
still rotate the knob to tighten/untighten the
door to the stand body.
Wear safety glasses dur-
ing the entire assembly
process. Failure to com-
ply may result in serious
personal injury.
• (4) Carriage Bolts
3
⁄8"-16 x 2"
• (4) Flat Washers
3
⁄8"
• (5) Hex Nuts
3
⁄8"-16
• (4) Carriage Bolts
5
⁄16"-18 x 1"
• (4) Phillips
®
Head Screws 10-20 x
1
⁄2"
• (6) Flat Washers
5
⁄16"
• (4) Lock Washers
5
⁄16"
• (4) Hex Nuts
5
⁄16"-18
• (2) Hex Bolts
5
⁄16"-18 x 1
1
⁄4"
• (1) 3mm Allen
®
Wrench
• (1) 5mm Allen
®
Wrench
• (1) 12mm Open End Wrench
• (1) Setscrew
1
⁄4"-20 x
1
⁄4"
• (1) Hex Bolt
3
⁄8"-16 x 2
1
⁄2"
• (1) Knob
5
⁄16"-18 x 1" (stand)
• (1) Lock Nut
5
⁄16"-18" (stand)
• (1) Knob
3
⁄8"-16 x 1" (table)
• (1) Pin 3 x 10 (table)
• (4) Cap Screws M6-1 x 30 (fence)
• (1) Knob
3
⁄8"-16 x
3
⁄4" (fence)
• (4) Spacer Sleeves (fence)


