


-11-
W1681 Buffing Assembly
OPERATIONS
Buffing/Polishing
The Model W1681 buffing assembly is a simple and straight-
forward machine to use. There are many different styles
of discs and compounds to choose from. It is very impor-
tant that you do not use grinding wheels on this machine.
The buffing assembly is designed exclusively for buffing
and polishing only.
To use your buffing assembly, do these steps:
1. Select the
3
⁄4" buffing wheels that you want to
install on the machine.
2. Loosen the arbor nuts located on each end of the
arbor. The left hand end of the arbor has left hand
threads and the right hand end of the arbor has right
hand threads.
3. Sandwich each buffing wheel between the wheel
flanges, making certain the convex side of the
washer faces away from the body of the buffing
wheels. Use only the wheel flanges supplied with the
machine.
4. Slide the buffing wheel assemblies onto each end of
the arbors and securely tighten each of the arbor
nuts, as shown in Figure 7.
5. Turn the buffing assembly ON and apply the desired
buffing compound to the rotating edge of the
wheels. Be sure to wear safety glasses and dust
mask, as compound often flies off during application
and operation.
6. Follow these tips while buffing your workpiece:
• Thoroughly clean all parts that you plan to buff.
Any kind of dirt, oil, rust, paint or other film must
be removed either chemically or sprayed off with
water. Make sure to dry off parts with a rag after
cleaning.
• Only use the area indicated in Figure 8 to do the
actual buffing. Contacting the workpiece on areas
outside the correct area may flip the workpiece
out of your hands.
• Hold the workpiece tightly at all times while buff-
ing. Placing one hand near the contact point will
give you better control.
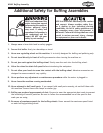
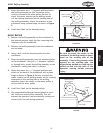
Arbor Shaft
Buffing Wheel
Arbor Nuts
Wheel Flanges
Figure 7. Buffing wheel assembled on
arbor.
Buffing and polishing can produce large
amounts of fine dust and particles. Be
sure to wear an appropriate respirator
mask. Do not use paper or cloth dust
masks.
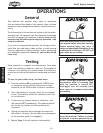
W
h
e
e
l
R
o
t
a
t
i
o
n
Figure 8. Location where workpiece
should contact wheel.
Workpiece
Contact Here
TOP
BOTTOM
FRONT
(Right Front Side View)