


-18-
W1701 1HP Shaper
OPERATIONS
Because the shaper fence is independently adjustable,
you can set up the shaper to cut part or all of the
workpiece edge.
To set the fence up for cutting material from the whole
edge of the workpiece, do these steps:
1. Loosen the locking handle shown in Figure 29.
2. Turn the adjustment knob located on the back of the
fence mount and adjust the infeed fence until the
workpiece contacts the cutter at the desired loca
-
tion.
3. Tighten the lock handle to lock the fence into posi-
tion.
4. Adjust the outfeed fence so that it is located as far
back from the front of the table as possible.
5. Turn the shaper ON.
6. Using a piece of scrap wood, advance the workpiece
8" into the cutters, and turn the machine
OFF. DO
NOT remove the workpiece from the infeed fence
face.
7. Once the cutter has come to a complete stop, adjust
the outfeed fence so that it just touches the newly
cut edge as shown in
Figure 30.
8. Make sure all fence lock handles are tight.
To set up the fence for partial edge removal, do these
steps:
1. Loosen the lock handle on the side of the fence
mount.
2. Turn the adjustment knob and adjust the infeed
fence until the workpiece contacts the cutter at the
desired location.
3. Tighten the lock handle to lock the fence into posi-
tion.
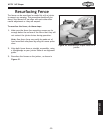
4. Adjust the outfeed fence so that it comes into align-
ment with the infeed fence as shown in
Figure 31.
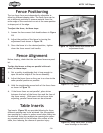
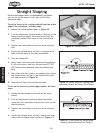
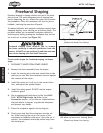
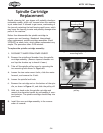
Straight Shaping
Figure 29. Fence controls.
Figure 30. Fence setup for jointing-type
operations (Guard Not Shown For Clarity).
Figure 31. Fence setup for partial-edge
removal (Guard Removed For Clarity).